FAQ
Frequently Asked Questions
- 원격지원·원격제어 프로그램을 찾아내는 데 가장 실용적인 프로그램
윈도우 컴퓨터에 설치된 **원격지원·원격제어 프로그램을 찾아내는 데 가장 실용적인 프로그램은 Microsoft Sysinternals의
Autoruns**입니다.Autoruns는 일반 설치 프로그램 목록뿐 아니라 다음 항목까지 확인할 수 있습니다.
- 윈도우 시작 시 자동 실행되는 프로그램
- 백그라운드 서비스
- 예약 작업
- 로그인 항목
- 드라이버
- 숨겨진 자동실행 항목
따라서 AnyDesk, TeamViewer, ScreenConnect/ConnectWise Control, Splashtop, RustDesk, RemotePC, LogMeIn, GoToAssist, Zoho Assist, UltraViewer 등의 원격 프로그램이 서비스 형태로 숨어 실행되는지 확인하기 좋습니다.
추천 점검 프로그램
1. Autoruns — 가장 추천
Microsoft 공식 무료 프로그램입니다. 관리자 권한으로 실행한 뒤 아래 탭을 확인하십시오.LogonServicesScheduled TasksDriversEverything
메뉴에서 Options → Hide Microsoft Entries를 선택하면 Microsoft 기본 항목이 숨겨져 외부 프로그램을 찾기 쉬워집니다.
주의: 모르는 항목을 바로 삭제하지 말고, 먼저 파일 위치와 디지털 서명을 확인해야 합니다.
2. Process Explorer
현재 실제로 실행 중인 프로세스와 해당 실행 파일의 위치, 사용자 계정, DLL 등을 확인할 수 있습니다. Autoruns가 자동실행 항목을 찾는 도구라면 Process Explorer는 현재 작동 중인 원격지원 프로그램을 확인하는 데 유리합니다.3. NirSoft UninstallView
윈도우의 일반 앱 목록보다 자세하게 설치된 프로그램을 보여줍니다. 로컬 컴퓨터뿐 아니라 조건이 맞으면 네트워크상의 다른 컴퓨터에 설치된 프로그램 목록도 확인할 수 있습니다.4. ESET Online Scanner
원격지원 프로그램 자체는 정상 소프트웨어일 수 있어 일반 백신이 항상 악성으로 탐지하지는 않습니다. 하지만 ESET은 설정에 따라 원격접속 도구를 ‘잠재적으로 위험한 애플리케이션’으로 탐지할 수 있습니다.제가 권하는 점검 순서
UninstallView로 설치 프로그램 목록 확인Autoruns로 서비스·예약 작업·자동실행 확인Process Explorer로 현재 실행 중인 프로세스 확인ESET Online Scanner로 추가 검사- Windows 설정에서 Remote Desktop과 Remote Assistance 활성화 여부 확인
단일 프로그램만 사용한다면 Autoruns가 가장 적합합니다. 다만 포터블 방식으로 실행되어 설치 목록에 남지 않는 원격지원 프로그램도 있기 때문에, Autoruns와 Process Explorer를 함께 사용하는 것이 정확합니다.
- Korean Softworld Inc DBA Howomputer Privacy policy
KOREAN SOFTWORLD, INC. DBA HOWCOMPUTER
TERMS AND CONDITIONS OF SALE
1. PAYMENT
Invoice is due and payable per the terms listed on the front of this invoice. An interest charge of 1.5% per month will be added to past-due accounts. Customer agrees to pay a $20.00 fee on any returned check, plus all legal and collection costs if necessary. Customers with net-term accounts paying by credit card are subject to a 3% convenience fee on outstanding invoices.
2. SOFTWARE SALES — ALL SALES FINAL
All software sales are final. HowComputer will not issue refunds or exchanges on any software purchased. Software products are licensed, not sold, and are subject to the applicable end-user license agreement (EULA) of the respective publisher.
3. SERVICE & SUPPORT
If a Buyer has any problem with a product purchased from HowComputer, HowComputer urges the Buyer to contact its technical support staff before deciding to return the product. An RMA number will be issued if no solution is reached (see Section 6).
4. WARRANTY
A one-year warranty is provided on all hardware products, unless otherwise specified by the manufacturer. Products may be returned within the first seven (7) days of purchase subject to a 15% restocking charge, in like-new condition in original packaging with all manuals, cables, and accessories included.
No refunds on goods after 7 days from date of purchase. Absolutely no refunds on special-order items regardless of purchase date.
5. RESTOCKING FEES
If HowComputer accepts returned merchandise, a restocking charge of fifteen percent (15%) of the purchase price will apply, unless other written arrangements have been made. Any merchandise returned for exchange must be approved by HowComputer in advance. Service and shipping charges are non-refundable.
NOTE: All items returned must be tested by the purchaser prior to sending back. If found non-defective upon inspection, Buyer is responsible for all shipping charges.
6. RETURN MERCHANDISE AUTHORIZATION (RMA)
All returns require a valid RMA number issued by HowComputer. Buyers must request an RMA within thirty (30) days of receipt of Goods. HowComputer reserves the right to retain a returned defective item for up to thirty (30) days for repair or exchange. No credit will be issued after thirty (30) days from the date of invoice.
7. LIMITED WARRANTY
All hardware products carry a one (1) year warranty. HowComputer warrants products to be free from defects in material and workmanship under normal use. Any return for full credit must be made within seven (7) days; thereafter a 15% restocking fee applies. This warranty does not cover products that have been modified, subjected to unusual electrical stress, or from which the HowComputer warranty seal has been removed. This warranty does not cover losses resulting from:
1. Shipping or improper installation or maintenance.
2. Misuse, neglect, or improper operating environment.
3. Any repair, modification, or installation of parts by anyone other than a HowComputer authorized service center.
4. Excessive or inadequate electrical power surges or other electrical irregularities.
5. Physical abuse, liquids, chemical spills, or corrosion from exposure to salt air.
8. DISCLAIMER OF ALL IMPLIED WARRANTIES
DISCLAIMER OF WARRANTIES: ALL GOODS ARE SOLD "AS IS." THERE ARE NO WARRANTIES, EXPRESS OR IMPLIED, INCLUDING ANY IMPLIED WARRANTY OF MERCHANTABILITY OR FITNESS FOR A PARTICULAR PURPOSE. BUYER EXPRESSLY ASSUMES ALL RISK AS TO THE QUALITY AND PERFORMANCE OF THE GOODS. 9. LIMITATION OF LIABILITY
HowComputer's total liability shall not exceed the purchase price paid for the specific product giving rise to the claim. HowComputer shall not be liable for consequential damage caused by the shipping carrier or for damage to hardware not purchased from HowComputer. In no event shall HowComputer be liable for any indirect, special, consequential, or punitive damages, including loss of use, revenue, or profits.
10. MANUFACTURER'S WARRANTIES
HowComputer will assist dealers in the repair or return of products covered under a manufacturer's warranty upon request. All manufacturer warranty claims must be directed to the respective manufacturer in accordance with that manufacturer's terms.
11. DISPUTE RESOLUTION AND ARBITRATION
The parties agree to attempt to resolve disputes through good-faith negotiation within thirty (30) days of written notice. If negotiation fails, disputes shall be submitted to binding arbitration administered by the American Arbitration Association (AAA) under its Commercial Arbitration Rules in Los Angeles County, California, before resorting to litigation.
12. GOVERNING LAW AND JURISDICTION
This agreement shall be governed by the laws of the State of California. Any legal action not resolved through arbitration shall be brought exclusively in the Superior Court of the State of California, County of Los Angeles.
13. FORCE MAJEURE
Except for payment obligations, nonperformance of either party shall be excused to the extent that performance is rendered impossible by strike, fire, flood, governmental acts, acts of terrorism, pandemic, or any other cause beyond the reasonable control of the nonperforming party.
14. PRIVACY AND DATA
HowComputer collects and processes customer information solely to fulfill orders and maintain the commercial relationship. HowComputer complies with applicable provisions of the California Consumer Privacy Act (CCPA) and California Privacy Rights Act (CPRA).
Korean Softworld, Inc. DBA HowComputer · Effective: 2001 · Governed by the laws of the State of California
- 윈도우 11에서 복사 붙여 넣기가 않되는 문제 해결
Windows 11에서 복사/붙여넣기 (Copy/Paste)가 안 되는 문제는 대부분 클립보드 프로세스 / 시스템 서비스 / 원격환경 중 하나입니다. 현장에서 바로 해결할 수 있도록 우선순위 기준으로 정확히 정리합니다.
✅ 1. 가장 빠른 해결 (1분)
- SSA-1199 Forms
- OAuth2 Authentication for Yahoo, AOL and ATT
https://support.mozilla.org/en-US/kb/thunderbird-and-yahoo
- 윈도우 11 설치 중 로컬 계정으로 로그인하는 방법
. 윈도우 11 설치 중 로컬 계정으로 로그인하는 방법
새 PC를 설정하거나 윈도우를 새로 설치하는 과정에서 MS 계정 로그인 화면이 나타날 때 다음 방법을 시도해 볼 수 있습니다.
-
네트워크 연결 화면에 진입합니다.
-
설치 과정 중 "네트워크에 연결하세요" 또는 "인터넷에 연결" 메시지가 표시되는 화면에서 멈춥니다.
-
-
명령 프롬프트를 실행합니다.
-
키보드에서 Shift 키와 F10 키를 동시에 누릅니다. (노트북의 경우 Fn 키를 함께 눌러야 할 수도 있습니다: Fn + Shift + F10)
-
검은색 명령 프롬프트 창이 나타납니다.
-
-
네트워크 요구 사항 우회 명령어를 입력합니다.
-
명령 프롬프트에 다음 명령어를 정확히 입력하고 Enter 키를 누릅니다.
oobe\bypassnro(띄어쓰기 없이 입력하며, 슬래시($/$)$ 대신 역슬래시($\backslash$)를 사용해야 합니다.)
-
-
PC가 다시 시작됩니다.
-
명령어를 실행하면 PC가 자동으로 다시 시작되고, 설정 초기 화면으로 돌아갑니다.
-
-
로컬 계정 생성을 선택합니다.
-
다시 시작 후 네트워크 연결 화면에서 "인터넷이 없어요" 또는 "I don't have internet" 옵션을 선택합니다. (이전에는 없던 옵션이 나타납니다.)
-
이후 "제한된 설치로 계속" 또는 **"Continue with limited setup"**을 선택하여 로컬 계정을 생성하는 화면으로 넘어갑니다.
-
-
로컬 계정 정보를 입력합니다.
-
원하는 사용자 이름을 입력합니다.
-
암호를 설정하거나 비워 두고 다음 단계로 진행하여 로컬 계정으로 윈도우 11 설정을 완료합니다.
-
2. 이미 MS 계정으로 로그인된 경우 로컬 계정으로 전환하는 방법
만약 현재 MS 계정으로 로그인하여 윈도우를 사용 중이라면, 설정 메뉴에서 로컬 계정으로 전환할 수 있습니다.
-
설정 앱을 엽니다.
-
Windows 로고 키 + i 키를 누르거나, 시작 메뉴에서 설정을 클릭합니다.
-
-
계정 설정으로 이동합니다.
-
왼쪽 메뉴에서 **"계정"**을 선택한 다음, **"사용자 정보"**를 클릭합니다.
-
-
로컬 계정으로 전환합니다.
-
"계정 설정" 섹션에서 **"대신 로컬 계정으로 로그인"**을 클릭합니다.
-
안내 창이 나타나면 다음을 클릭하고, 현재 MS 계정의 비밀번호나 PIN을 입력하여 본인 인증을 합니다.
-
-
로컬 계정 정보를 설정합니다.
-
새로 사용할 로컬 계정의 이름과 **암호(선택 사항)**를 입력합니다.
-
**"로그아웃 및 마침"**을 클릭하면 로컬 계정으로 전환이 완료되며, 다시 로그인하게 됩니다.
-
윈도우 11 설치 시 MS 계정없이 로컬계정 전환 설치 두 가지 방법 이 영상은 Microsoft 계정 없이 Windows 11을 로컬 계정으로 설치하는 두 가지 방법을 보여줍니다.
-
- Adobe PDF 프린터”가 설치되지 않았거나 사라졌을 때 해결하는 방법
Adobe Acrobat에서 “Adobe PDF 프린터”가 설치되지 않았거나 사라졌을 때 해결하는 방법을 단계별로 정리해드릴게요.
- Download and run the Creative Cloud Cleaner tool
https://helpx.adobe.com/creative-cloud/apps/troubleshoot/diagnostics-repair-tools/run-creative-cloud-cleaner-tool.html
- Check if a device meets Windows 11 system requirements after changing device hardware
https://support.microsoft.com/en-us/windows/check-if-a-device-meets-windows-11-system-requirements-after-changing-device-hardware-f3bc0aeb-6884-41a1-ab57-88258df6812b
Support for Windows 10 has ended on October 14, 2025
After October 14, 2025, Microsoft will no longer provide free software updates from Windows Update, technical assistance, or security fixes for Windows 10. Your PC will still work, but we recommend moving to Windows 11.
This article covers upgrading to Windows 11 after making changes to a Windows device's hardware. Hardware changes might affect Windows 11 upgrade eligibility. A few steps need to be taken to see the updated eligibility in Settings.
This article might also apply if messages in the PC Health Check app and the Windows Update page in Settings don't match.
The easiest way to see if a device meets the requirements for Windows 11 after making hardware changes to the device is with the PC Health Check app:
-
Download and install the PC Health Check app. The PC Health Check app can be downloaded from the following link:
Download the PC Health Check app -
Right-click on the Start menu and select Search .
-
In the Type here to search text box, enter:
pc health check -
Under Best match, select PC Health Check from the list of results.
-
In the PC Health Check windows that opens, select the Check now button.
It can take up to 24 hours for Windows Update to refresh eligibility info. If the eligibility info isn't updating in a timely manner, Windows 11 eligibility assessment can be manually refreshed.
Note: Changing a device's hardware to supported hardware doesn't necessarily mean the device is offered Windows 11 immediately. The upgrade will roll out over time to in-market devices based on intelligence models that consider hardware eligibility, reliability metrics, device age, and other factors. Microsoft intends to roll out the offer to upgrade as quickly as possible, while ensuring a high-quality experience.
How to manually refresh Windows 11 eligibility assessment
To manually refresh Windows 11 eligibility assessment, select one of the following options:
-
Refresh eligibility assessment using Task Scheduler.
-
Refresh eligibility assessment from an administrator Command Prompt.
Refresh using Task Scheduler
-
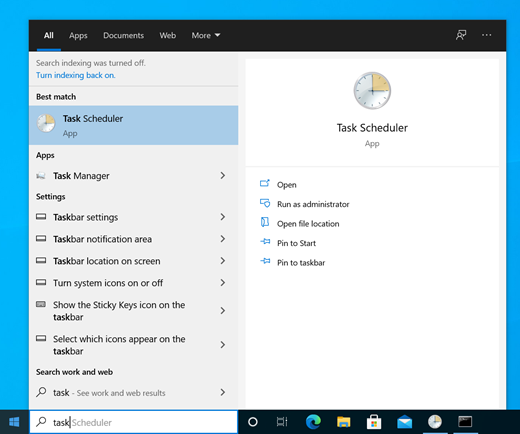
Right-click on the Start menu and select Search .
-
In the Type here to search text box, enter:
task scheduler -
Under Best match, select Task Scheduler from the list of results.
-
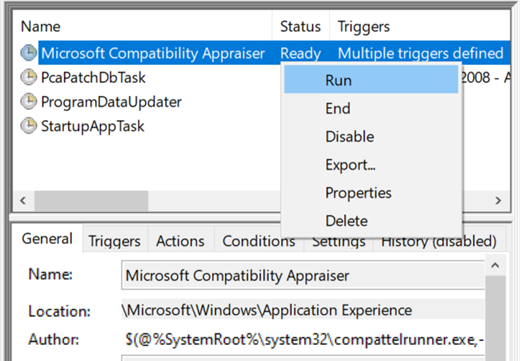
In the Task Scheduler window that opens, using the left navigation pane, navigate to Task Scheduler Library > Microsoft > Windows > Application Experience.
-
Right-click on the Microsoft Compatibility Appraiser task and then select Run.
Note: If the error The user account does not have permission to run this task appears, sign in with an account that has administrator privileges or follow the instructions in the Refresh using an administrator Command Prompt section.
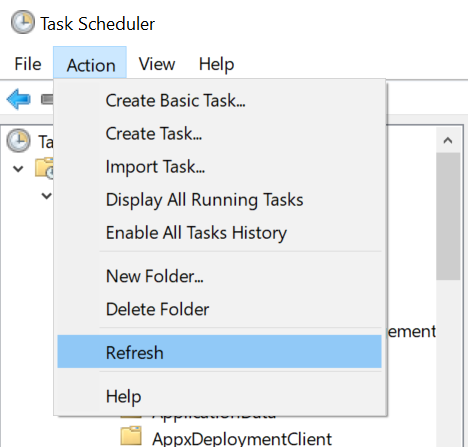
-
Wait until the task completes. The task completes when its Status column shows Ready. To refresh the status, select Action > Refresh in the top navigation menu.
Refresh using an administrator Command Prompt
-
Right-click on the Start menu and select Search .
-
In the Type here to search text box, enter:
cmd -
In list of results, on the right-hand side under Command Prompt, select Run as administrator.
-
If the User Account Control window appears, select the Yes button. If the User Account Control window asks for an admin user name and password, enter a user name and password of an account that has administrator privileges and then select the Yes button.
-
In the Administrator: Command Prompt window that appears, enter the following command:
schtasks.exe /Run /TN "\Microsoft\Windows\Application Experience\Microsoft Compatibility Appraiser" -
Select the Enter key to run the command.
-
Wait a few of minutes for the task to complete.
To view the updated eligibility assessment status:
-
Select Start and then select Settings > Update & Security > Windows Update .
Or
Select the following Windows Update shortcut:
Open Windows Update -
In the Windows Update window that opens, select the Check for updates button.
-
- Windows 10 소비자 ESU(확장 보안 업데이트)
https://www.microsoft.com/ko-KR/windows/extended-security-updates?r=1
- Error: Windows can't find desktop_ut.msi or desktop_fa.msi
https://www.thomsonreuters.com/en-us/help/ultratax-cs/troubleshoot-installation-issues/desktop-setup/error-windows-cant-find-desktop-ut-msi-or-desktop-
Scenario
You may get the following error message during the desktop setup for UltraTax CS or Fixed Assets CS.
Error messages
Windows cannot find desktop_ut.msi make sure the name is typed correctly and try again.
Windows cannot find desktop_fa.msi make sure the name is typed correctly and try again.
Cause
A blocked installer or Windows permissions issues can cause these errors.
Solution 1: Unblock the installation file
Files downloaded to install an application can be automatically blocked by the computer. Follow these steps to unblock a file:-
Find the file used to install the application.
- Right-click the file and select
Properties
. - Select the
General
tab,Unblock
, thenOK
. - Rename the
UT
orDSW
folder and reinstall.
Solution 2: Permissions
Ask your IT professional or network administrator to review the permissions guidelines for CS Professional Suite.
In addition to changing folder permissions, you may also need to run the installer using the system account instead of the domain admin account.
-
If you can't install to a network drive, first get the logs referenced in the installer logging and save them for development.
-
Extract the ZIP file to a folder location on the computer or network that will run UltraTax CS or Fixed Assets CS installer.
- Using the computer you'll use for the installation, select
Start
thenAccessories
. Right-clickCommand Prompt
and selectRun as administrator
. - Enter
psexec -i -s cmd.exe
thenEnter
. - Enter
net use X: \\ComputerName\ShareName
(replace X with the network drive you want to map).
This article applies to:
- Product: UltraTax CS
-
- Beginning September 30, 2024: third-party apps that use only a password to access Google Accounts and Google Sync will no longer be supported
https://workspaceupdates.googleblog.com/2023/09/winding-down-google-sync-and-less-secure-apps-support.html

Updates
This official feed from the Google Workspace team provides essential information about new features and improvements for Google Workspace customers.
Beginning September 30, 2024: third-party apps that use only a password to access Google Accounts and Google Sync will no longer be supported
Friday, September 29, 2023
[Update - February 12, 2025]: Less Secure Apps will no longer be supported as of March 14, 2025.
[Update - January 27, 2025]: We have resumed rollout and final disablement is planned for March 2025. We will follow-up with a specific date in the coming weeks.
[Update - October 15, 2024]: Rollout for this update has been paused for the remainder of the year and will resume in January 2025. In the interim, GoogleSync and Less Secure Apps will continue to function as usual. We’ll share another update here when rollout resumes.
What’s changing
As part of our commitment to user safety, Google Workspace will no longer support the sign-in method for third-party apps or devices that require users to share their Google username and password. This antiquated sign-in method, known as Less Secure Apps (LSAs), puts users at an additional risk since it requires sharing Google Account credentials with third-party apps and devices that can make it easier for bad actors to gain unauthorized access to your account.
Instead, you’ll need to use the option to Sign-In with Google, which is a safer and more secure way to sync your email to other apps. Sign-in with Google leverages industry standard and more secure OAuth method of authentication already used by the vast majority of third-party apps and devices.
We previously announced this change in 2019, and are now ready to share an updated timeline regarding this change:
Access to Less Secure Apps (LSA) will be turned off in two stages:
- Beginning June 15, 2024:
- The LSA settings will be removed from the Admin console and can no longer be changed. Enabled users can connect during this time, but disabled users will no longer be able to access LSAs. This includes all third-party apps that require password-only access to Gmail, Google Calendar, Contacts via protocols such as CalDAV, CardDAV, IMAP, SMTP, and POP.
- The IMAP enable/disable settings will be removed from users’ Gmail settings.
- If you’ve been using LSAs prior to this date, you can continue using them until September 30, 2024.
- The LSA settings will be removed from the Admin console and can no longer be changed. Enabled users can connect during this time, but disabled users will no longer be able to access LSAs. This includes all third-party apps that require password-only access to Gmail, Google Calendar, Contacts via protocols such as CalDAV, CardDAV, IMAP, SMTP, and POP.
- Beginning September 30, 2024:
- Access to LSAs will be turned off for all Google Workspace accounts. CalDAV, CardDAV, IMAP, POP and Google Sync will no longer work when signing in with just a password — you will need to login with a more secure type of access called OAuth.
As part of this change, Google Sync will also be sunsetted:- Beginning June 15, 2024: New users will not be able to connect to Google Workspace via Google Sync.
- September 30, 2024: Existing Google Sync users will not be able to connect to Google Workspace. Here is how you can transition your organization off Google Sync. To find Google Sync usage in your organization, please go to the Admin Console, navigate to Devices > Mobile & Endpoints > Devices, and filter by Type: Google Sync.
See below for more specific guidance for admins, end users, and developers regarding this change.
Who’s impacted
Admins and end users
Getting StartedAdmins
Preparing your end users
In order for your end users to continue using these types of apps with their Google Workspace accounts, they must switch to a more secure type of access called OAuth. You’ll receive more information via email with affected users in your organization in the coming months. We recommend that you share the user instructions (included below) to help them make the necessary changes.
Mobile Device Management (MDM) Impact
If your organization uses a mobile device management (MDM) provider to configure IMAP, CalDAV CardDAV, POP or Exchange ActiveSync (Google Sync) profiles, these services will be phased out according to the timeline below:
June 15, 2024
MDM push of password based IMAP, CalDAV, CardDAV, STMP, POP and Exchange ActiveSync (Google Sync) will no longer work for customers who try to connect to an LSA for the first time.
If you use Google Endpoint Management, you will not be able to turn on "Custom Push Configuration" settings for CalDAV and CardDAV.
September 30, 2024
MDM push of password based IMAP, CalDAV, CardDAV, SMTP and POP will no longer work for existing users. Admins will need to push a Google Account using their MDM provider, which will re-add their Google accounts to iOS devices using OAuth.
MDM push of password based Exchange ActiveSync (Google Sync) will no longer work for existing users. Admins will need to push a Google Account using their MDM provider, which will re-add their Google accounts to iOS devices using OAuth.
If you use Google Endpoint Management, “Custom push configuration-CalDAV” and “Customer push configuration-CardDAV” (more details about the settings here) will stop being effective.
Scanners and other devices
If you have scanners or other devices using simple mail transfer protocol (SMTP) or LSAs to send emails, you’ll need to either: configure them to use OAuth, use an alternative method, or configure an App Password for use with the device.
End users
If you are using an app that accesses your Google Account with only a username and password, take one of the following actions to continue to access your email, calendar, or contacts. If you do not take one of the following actions by September 30, 2024, you will begin receiving an error message that your username-password combination is incorrect and you will not be able to log in.
Email Applications
Outlook 2016 or Earlier
Move to Microsoft 365 (formerly known as Office 365, a web-based version of Outlook) or Outlook for Windows or Mac, both of which support OAuth access.
Alternatively you can use Google Workspace Sync for Microsoft Outlook.
Thunderbird or another email client
Re-add your Google Account and configure it to use IMAP with OAuth.
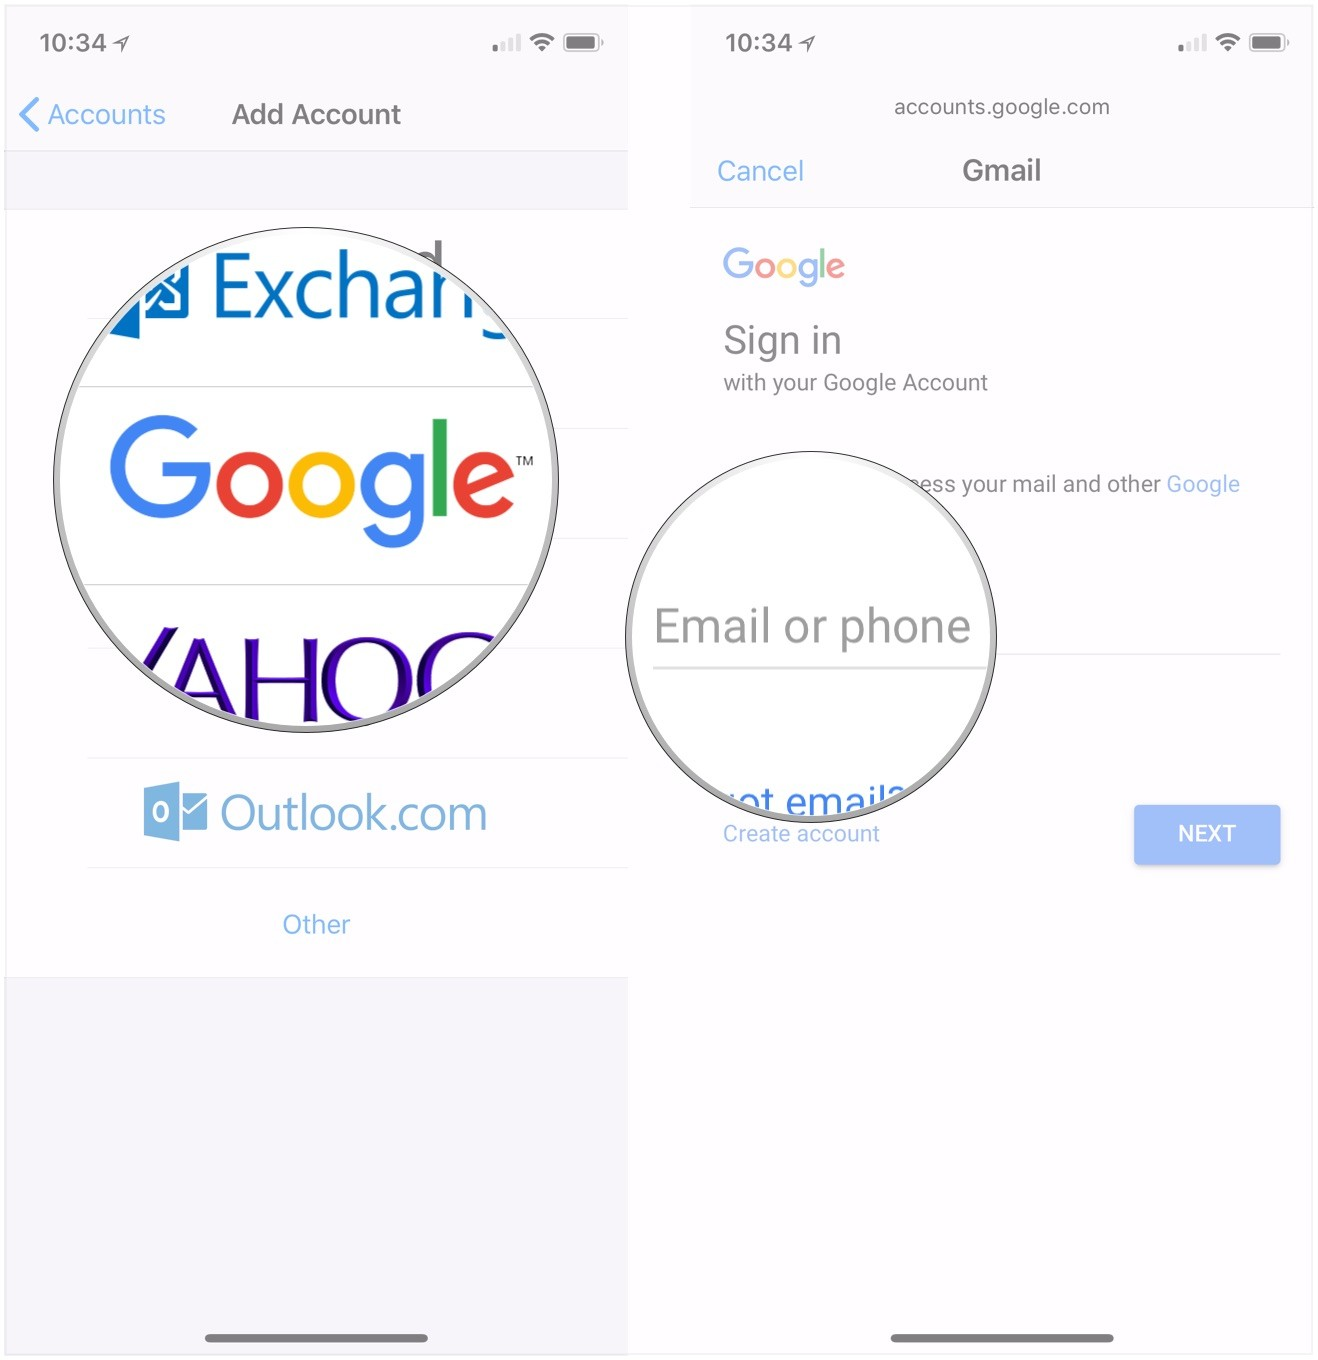
The mail app on iOS or MacOS, or Outlook for Mac and use only a password to login
You’ll need to remove and re-add your account. When you add it back, select “Sign in with Google” to automatically use OAuth.
MacOS:
iOS:
Calendar Applications
- If you use an app that uses password based CalDAV to give access to your calendar, switch to a method that supports OAuth. We recommend the Google Calendar app [Web/iOS/Android] as the most secure app to use with your Google Workspace account.
- If your Google Workspace account is linked to the calendar app in iOS or MacOS and uses only a password to login, you’ll need to remove and re-add your account to your device. When you add it back, select “sign in with Google” to automatically use OAuth. Read more.
Contacts Applications
- If your Google Workspace account is syncing contacts to iOS or MacOS via CardDAV and uses only a password to login, you’ll need to remove your account. When you add it back, select “sign in with Google” to automatically use OAuth. Read More.
- If your Google Workspace account is syncing contacts to any other platform or app via CardDAV and uses only a password to login, switch to a method that supports OAuth.
All Other Applications
If the app you are using does not support OAuth, you will need to switch to an app that offers OAuth or create an app password to access these apps.
Developers
To maintain compatibility with Google Workspace accounts, update your app to use OAuth 2.0 as a connection method. To get started, follow our developer guide on using OAuth 2.0 to access Google APIs. You can also refer to our guide on OAuth 2.0 for mobile & desktop apps.
Users with personal Google accounts: In the coming weeks we will be removing the IMAP enable/disable toggle from your Gmail settings. IMAP access is always enabled over OAuth and your current connections will not be impacted. No action is required of users.
Availability
- This change impacts all Google Workspace customers.
Resources
- Beginning June 15, 2024:
- Less secure apps & your Google Account
https://support.google.com/accounts/answer/6010255?sjid=3261833803659382159-NC&authuser=3
Less secure apps & your Google Account
Starting January 2025, less secure apps, third-party apps, or devices that have you sign in with only your username and password will no longer be supported for Google Workspace accounts. For exact dates, visit Google Workspace Updates. To continue to use a specific app with your Google Account, you’ll need to use a more secure type of access that doesn’t share password data. Learn how to use Sign in with Google.
If an app or site doesn’t meet our security standards, Google might block anyone who’s trying to sign in to your account from it. Less secure apps can make it easier for hackers to get in to your account, so blocking sign-ins from these apps helps keep your account safe.
Use more secure apps
If an app uses less secure sign-in technology, you might not be able to use it with your Google Account.
Apps that use only your username or password will create errors if they try to access your Google Account. These errors can appear as:
- “Invalid username”
- “Invalid password”
- “Unable to log in”
You can sign in to your Google Account from any third-party app that has the "Sign in with Google" option. In some cases you may need to remove your Google Account and then add it again on your device.
Give feedback about this article
- Read Gmail messages on other email clients using POP
https://support.google.com/mail/answer/7104828?authuser=3&hl=en&authuser=3&visit_id=638785423435811166-2050397037&rd=1
Read Gmail messages on other email clients using POP
You can open your messages from Gmail in other mail clients that support POP, like Microsoft Outlook.
Step 1: Make sure POP is the best way to read your emails
- IMAP and POP are both ways to read your Gmail messages in other email clients.
- IMAP can be used across multiple devices. Emails are synced in real time.
- POP can only be used for a single computer. Emails aren't synced in real time. Instead, they're downloaded and you decide how often you want to download new emails.
Step 2: Set up POP
Important: You’re signed in to your work or school account: tina@offlineinc.com. To use POP, your administrator must turn it on. If you can’t find the option to forward messages, contact your administrator.
First, set up POP in Gmail
Important: After you turn on POP in Gmail, it may take some time to download your messages to your email client.
- On your computer, open Gmail.
- In the top right, click Settings
See all settings.
- Click the Forwarding and POP/IMAP tab.
- In the "POP download" section, select:
- Enable POP for all mail (even mail that’s already been downloaded)
- Enable POP for mail that arrives from now on
- Under “When messages are accessed with POP,” select what happens to Gmail’s copy of the message:
- Keep Gmail’s copy in the Inbox
- Mark Gmail’s copy as read
- Archive Gmail’s copy
- Delete Gmail’s copy
- At the bottom of the page, click Save Changes.
Next, make changes on your email client
Go to your client, such as Microsoft Outlook, and check these settings.
Incoming Mail (POP) Server pop.gmail.com
Requires SSL: Yes
Port: 995
Outgoing Mail (SMTP) Server smtp.gmail.com
Requires SSL: Yes
Requires TLS: Yes (if available)
Requires Authentication: Yes
Port for TLS/STARTTLS: 587
If you use Gmail with your work or school account, check with your administrator for the correct SMTP configuration.
Server timeouts Greater than 1 minute (5 is recommended) Full name or display name Your name Account name, username, or email address Your email address Password Your Gmail password - Windows PC에서 Apple 계정 생성하기
https://support.apple.com/ko-kr/108647
- Windows 11, version 24H2 won't install
https://answers.microsoft.com/en-us/windows/forum/all/windows-11-version-24h2-wont-install/c50f087f-3e2c-478c-9d9a-3af3f6d227f3
There may be some system issues, you can try to fix your system and drivers by following the steps below:
1. Clear Windows Update Cache
Sometimes corrupted update files can cause the installation to fail, and clearing the Windows Update cache may help:
Stop the Windows Update service:
Open Command Prompt as an administrator (right-click the Start menu > select Command Prompt (Administrator) or PowerShell (Administrator)).
Enter the following command:
net stop wuauserv
Delete the update cache:
Go to the C:\Windows\SoftwareDistribution\Download folder and delete all files in it.
Restart the Windows Update Service:
Enter the following command:
net start wuauserv
2. Run DISM and SFC scans
Corrupt system files may prevent the update from installing. Running a DISM (Deployment Image Service and Management Tool) and SFC (System File Checker) scan can help fix these issues:
DISM:
Open a command prompt as administrator.
Enter the following command:
DISM /Online /Cleanup-Image /RestoreHealth
This may take some time, please be patient.
SFC:
After DISM is complete, type:
sfc /scannow
Let it finish and then try the update again.
Disclaimer: Running Microsoft Safety Scanner can help you check if the system is disturbed or malicious software exists. To avoid any trouble for you, please back up all your personal files first to ensure you do not lose data.
3. Updating Drivers
Make sure your drivers, especially the graphics card and chipset drivers, are up to date. Outdated drivers may prevent the update from installing. You can visit the official website of the brand of your computer to download them.
After that you can try the override installation method to repair your system and install 24H2.
Let’s try performing an in-place install or in-place upgrade which will refresh your Windows files and operating system without removing files or applications. That being said, we always recommend that if you have important data, you should back it up before making large system changes. If you want to back up your data first, please do so. Once you are done backing up, you can follow the steps in the following guides: How to run In-place upgrade in Windows 11 - Microsoft Community
- Previous versions of TeamViewer
https://www.teamviewer.com/en/download/previous-versions/previous-version-14x/?_ga=2.4478715.995188776.1682339391-425066578.1682097454
- Previous versions of TeamViewer
https://www.teamviewer.com/en/download/previous-versions/previous-version-14x/?_ga=2.4478715.995188776.1682339391-425066578.1682097454
- Previous versions of TeamViewer
https://www.teamviewer.com/en/download/previous-versions/previous-version-14x/?_ga=2.4478715.995188776.1682339391-425066578.1682097454
- Windows 10 Home and Pro follows the Modern Lifecycle Policy.
https://learn.microsoft.com/en-us/lifecycle/products/windows-10-home-and-pro
Windows 10 Home and Pro
Windows 10 Home and Pro follows the Modern Lifecycle Policy.
This applies to the following editions: Home, Pro, Pro Education, Pro for Workstations
Important
Windows 10 will reach end of support on October 14, 2025. The current version, 22H2, will be the final version of Windows 10, and all editions will remain in support with monthly security update releases through that date. Existing LTSC releases will continue to receive updates beyond that date based on their specific lifecycles.
Support dates are shown in the Pacific Time Zone (PT) - Redmond, WA, USA.
Support Dates
Expand table
Listing Start Date Retirement Date Windows 10 Home and Pro Jul 29, 2015 Oct 14, 2025 Releases
Expand table
Version Start Date End Date Version 22H2 Oct 18, 2022 Oct 14, 2025 Version 21H2 Nov 16, 2021 Jun 13, 2023 Version 21H1 May 18, 2021 Dec 13, 2022 Version 20H2 Oct 20, 2020 May 10, 2022 Version 2004 May 27, 2020 Dec 14, 2021 Version 1909 Nov 12, 2019 May 11, 2021 Version 1903 May 21, 2019 Dec 8, 2020 Version 1809 Nov 13, 2018 Nov 10, 2020 Version 1803 Apr 30, 2018 Nov 12, 2019 Version 1709 Oct 17, 2017 Apr 9, 2019 Version 1703 Apr 11, 2017 Oct 9, 2018 Version 1607 Aug 2, 2016 Apr 10, 2018 Version 1511 Nov 10, 2015 Oct 10, 2017 Version 1507 Jul 29, 2015 May 9, 2017