FAQ
Frequently Asked Questions
- How to Repair or Fix MBR (Master Boot Record) in Windows 10/8/7/Vista/XP
How to Repair or Fix MBR (Master Boot Record) in Windows 10/8/7/Vista/XP
Updated by Daisy on Mar 30, 2021
Are you looking for a way to fix the MBR in Windows 10/8/7? On this page, we'll show you what is MBR, the causes and symptoms of MBR corruption, and how to fix MBR with practical fixes.
Check out the fixes and learn how to repair the corrupted MBR and make your PC boot up normally again:
PAGE CONTENT:
- What Is the MBR
- What Happens if MBR Corrupted
- Fix MBR in Windows 10/8/7 with EaseUS Partition Master
- Fix MBR Using Command Prompt on Windows 10/8/7/Vista/XP
Note: All the troubleshooting fixes are only available for MBR disk on Windows PC. If your OS disk is with GPT, turn to Repair EFI Bootloader in Windows 10/8/7 for help.
How to repair the damaged MBR? Here we'll provide a safe and reliable procedure to help you. Just follow the directions below.
Workable Solutions Step-by-step Troubleshooting Fix 1. Use MBR rebuild tool - Boot PC from EaseUS Partition Master bootable disk
- Right-lick the OS disk and choose 'Rebuild MBR'
- Select the type of MBR with your OS...Full steps
Fix 2. Rebuild MBR via CMD - Boot PC from Windows installation disk
- Open the Command Prompt
- Type command lines to fix MBR...Full steps
What Is the MBR
The MBR, short for Master Boot Record, also known as the "master partition table" or "partition sector", is a boot sector (a region of your hard drive) that holds information about the partitions of your hard drive and acts as a loader for the operating system you're running.
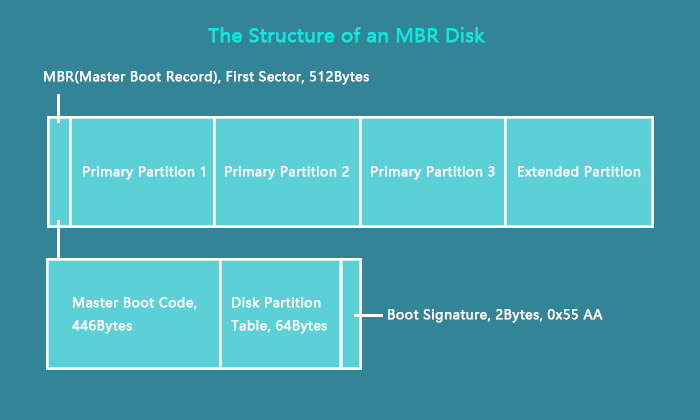
The Master boot record is created by the MBR generator when you first install Windows on an MBR disk. It's the first 512 bytes of your hard disk as the image shown here.
The MBR partition contains two important components:
- Master Boot Code
- Disk Partition Table
Both two components work together to transfers program control to the boot sector of that partition so as to continue the boot process and help Windows OS boot up successfully.
Learn More: What Is MBR Disk.
What Happens if MBR Corrupted
In this part, you'll learn:
- 1. The causes of MBR corruption
- 2. What happens if MBR corrupted
- 3. When do you need to fix and repair MBR
Mostly, MBR corrupted or damaged error is caused by improper unplugging, sudden power failure, virus infection, etc.
What happens if MBR is corrupted? Corrupted or damaged MBR will stop you from entering the operating system, showing error messages like the operating system not found, or simply a black screen without any prompt message.
So what are the signs of MBR corruption?
If you receive the following error messages while booting up PC, it means that the MBR is corrupted on your PC:
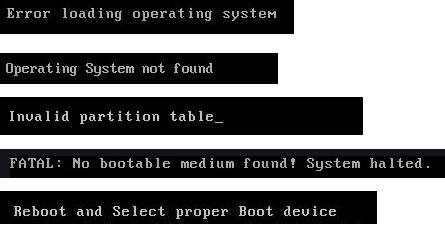
- 1.Error loading operating system
- 2.Operating System not found
- 3.Invalid partition table
- 4. No bootable medium found
- 5. Reboot and select proper boot device
If anyone of the above symptoms shows up on your PC, don't worry.
You can fix corrupted MBR immediately and make your computer boot up normally again with the fixes as shown in the next parts.
Method 1. Fix MBR in Windows 10/8/7 with EaseUS Partition Master
Applies to: Windows 10, 8.1, 8, 7, XP, Vista; Windows 2000, Windows 2012.
Compared to the manual fixes, EaseUS partition software - Partition Master offers you the easiest resolution to fix MBR. It has a feature called "Rebuild MBR". Once the MBR (Master Boot Record) is damaged, you can simply apply this feature to fix the Master Boot Record without destroying the disk partition table.
Free DownloadWindows 10/8.1/8/7/Vista/XP
To fix MBR, you have two options with the help of EaseUS Partition Master:
1. Connect the MBR hard disk to another working computer for repair; 2. Create a WinPE bootable disk to make your computer bootable.
If you have a spare computer, jump to Step 2 for a guide. Without a second computer, follow the process here to fix corrupted MBR on your own:
Step 1. Create a WinPE bootable disk
- Launch EaseUS Partition Master, click "WinPE Creator" on the toolbar. Select to create the bootable disk on a USB drive. If your computer has a CD/DVD drive, you can also create the bootable disk to CD/DVD.
- Click "Proceed" to finish the process.

Step 2. Boot EaseUS Partition Master Bootable USB
- Connect the bootable USB or CD/DVD to your PC.
- Press F2 or Del when you restart the computer to enter the BIOS screen. Set and boot your computer from "Removable Devices" or "CD-ROM Drive". And then EaseUS Partition Master will run automatically.
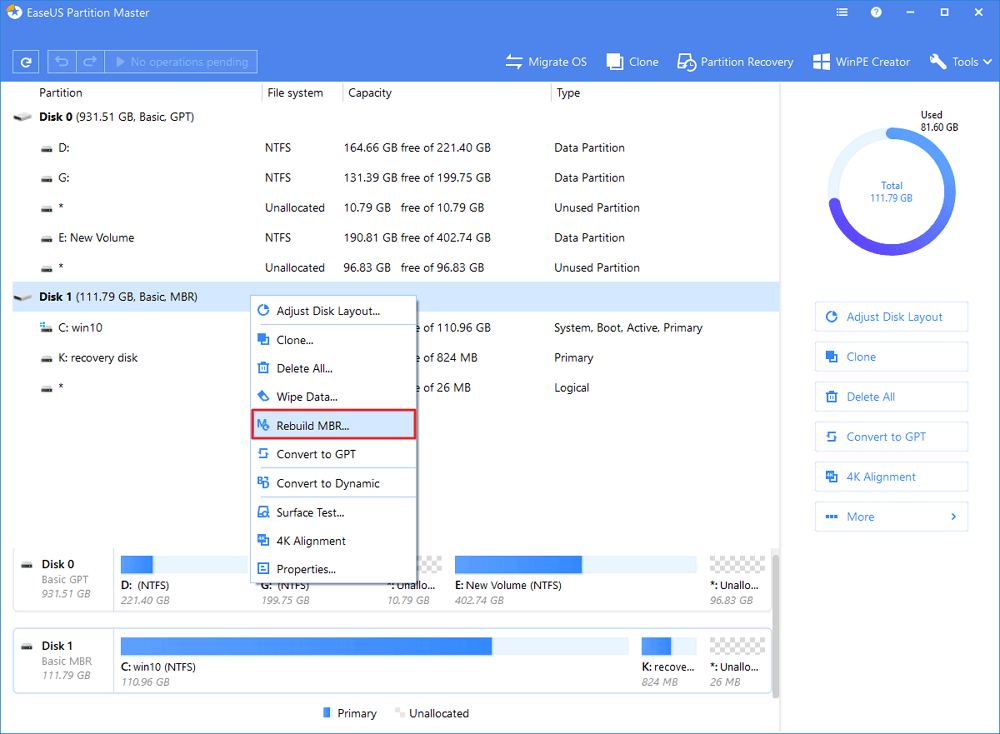
Step 3. Rebuild MBR
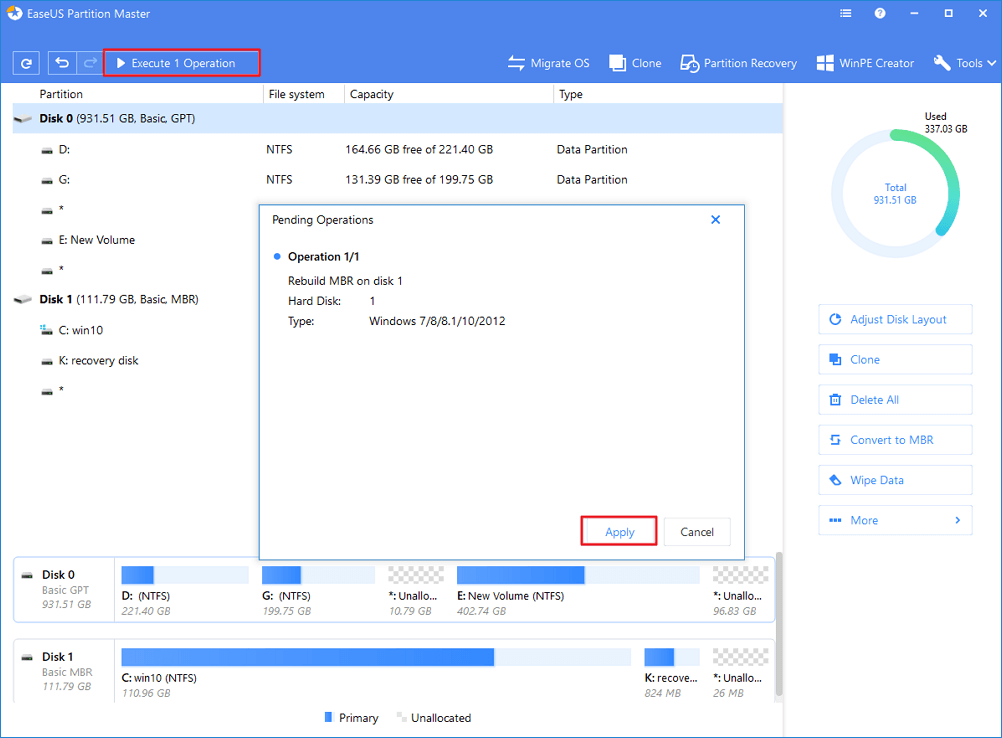
- Right-click the disk whose MBR is damaged. Choose "Rebuild MBR" to continue.
- Select the type of MBR with the current operating system. Then, click "OK".
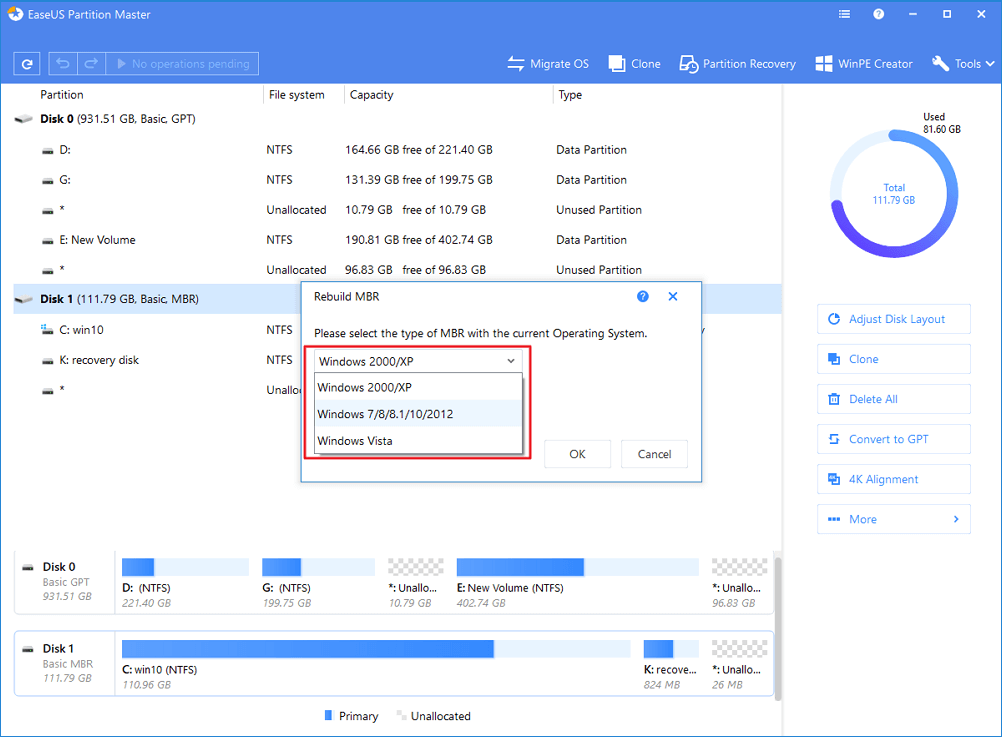
- Click the "Execute Operation" button at the top-left corner and click "Apply" to build the MBR. After that, your computer can boot normally again.
Do You Need Specialized Services for System Boot Issues?
EaseUS also provides 1-on-1 remote assistance to fix the boot issue. If the solution above does not work for you, please contact our professionals via Email or LiveChat in this page. To ensure our professional assistance work, you are suggested to connect the unbootable system drive to a healthy computer when getting connected with us.
Method 2. Fix MBR Using Command Prompt on Windows 10/8/7/Vista/XP
Applies to: Manually repair corrupted MBR on Windows 10/8/7, Vista, etc.
When MBR corrupted on Windows PCs, you can apply the possible ways to manually fix MBR on your PC using Command Prompt. As the Windows version differs, the specific steps also vary.
Pick up the right resolution to fix MBR on your Windows PC now:
- #1. Fix MBR on Windows 10
- #2. Fix MBR on Windows 8.1/8
- #3. Fix MBR on Windows 7
- #4. Fix MBR on Windows Vista
- #5. Fix MBR on Windows XP
Fix MBR on Windows 10 via CMD
To help you fix MBR in a more straightforward way, you may follow this video to start from 0:25 so as to repair MBR:
Step-by-step guide to open command Prompt to fix MBR in Windows 10:
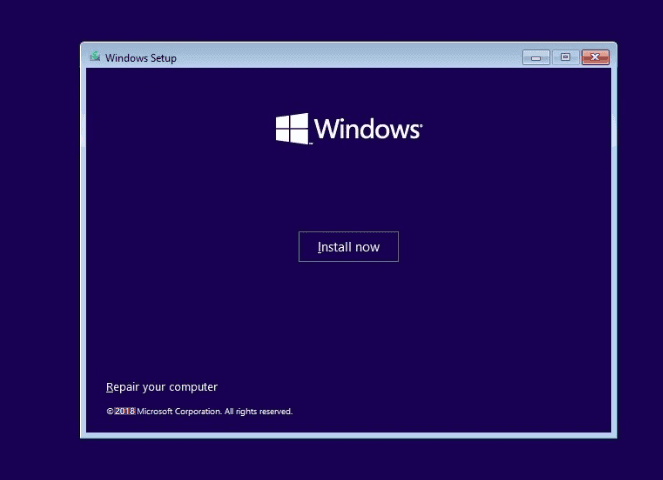
Step 1. Boot PC from the original Windows installation DVD (or the recovery USB).
Step 2. At the Install screen, click "Repair your computer".
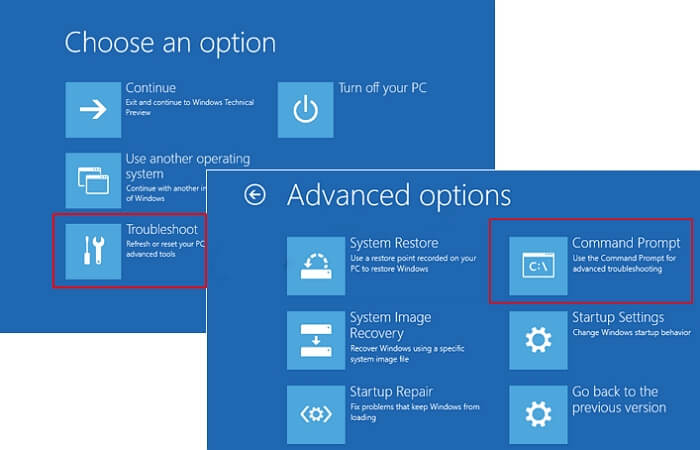
Step 3. Choose "Troubleshoot" > "Advanced Options" > "Command Prompt".
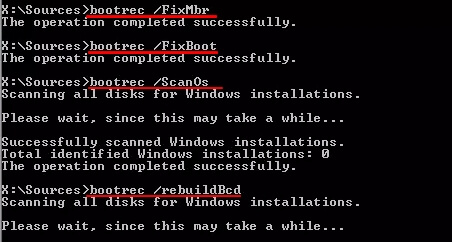
Step 4. Enter the following lines in Command Prompt and hit Enter each time:
- bootrec /fixmbr
- bootrec /fixboot
- bootrec /scanos
- bootrec /rebuildbcd
Step 5. After this, type exit to close Command Prompt and restart Windows 10.
You should be able to boot Windows 10 successfully now.
Fix MBR in Windows 8.1/8 Using Command Prompt
Step 1. Boot from Windows installation DVD or recovery USB.
Step 2. Select "Repair your computer" at the Install screen.
Step 3. Go to Troubleshoot > Command Prompt.
Step 4. Type the following command lines and hit Enter each time:
- bootrec /fixmbr
- bootrec /fixboot
- bootrec /scanos
- bootrec /rebuildbcd
Step 5. Type exit and restart PC.
Your Windows 8 computer should be able to boot up normally now.
Fix MBR in Windows 7 via CMD
Step 1. Boot Windows 7 from its installation DVD.
Step 2. Press any key to boot from DVD.
Step 3. Select a language, keyboard layout, click "Next".
Step 4. Select "Operating System" and click "Next".
Remember to check "Use recovery tools that can help fix problems starting Windows".
Step 5. Click "Command Prompt" at the System Recovery Options screen.
Step 6. Type the following lines and hit Enter each time:
- bootrec /fixmbr
- bootrec /fixboot
- bootrec /rebuildbcd
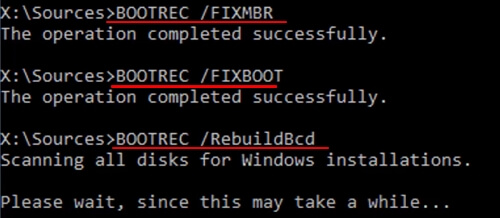
Step 7. Type exit to close the window and restart your PC.
Now, you can visit files and applications on your Windows 7 computer again.
Fix MBR on Windows Vista
Step 1. Boot from Windows Vista installation CD or DVD.
Step 2. Select a language, keyboard layout, click "Next".
Step 3. Click "Repair your computer" at the Install screen.
Step 4. Select "Operating System" and click "Next".
Step 5. When the System Recovery Options appears, click "Command Prompt".
Step 6. Type the following lines and hit Enter each time:
- bootrec.exe /fixmbr
- bootrec.exe /fixboot
- bootrec.exe /rebuildbcd
Step 7. Type exit and hit Enter to close the window.
Restart Windows 7 and you can use everything on your computer again.
Fix MBR on Windows XP
Step 1. Boot from Windows XP CD.
Step 2. Open Recovery Console on the Welcome screens.
Step 3. Type 1 and hit Enter.
Step 4. Enter your password and hit Enter.
Step 5. Type fixmbr and hit Enter.
Step 6. Type Y and hit Enter.
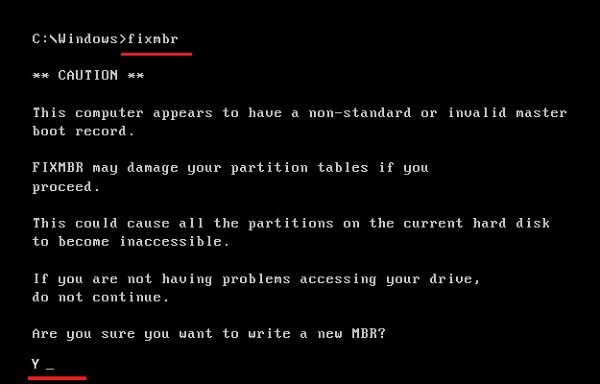
Step 7. Type exit and hit Enter.
After this, restart your Windows XP computer, it will boot up normally again.
Conclusion
On this page, we explained what is MBR, what happens if the MBR corrupted, and under what circumstances you will need to fix the MBR. We also collect two practical ways to fix MBR in Windows 10/8/7/Vista, XP.
For the easiest resolution, EaseUS Partition Master worths a try. It's easy and efficient in fixing MBR, making your PC bootable again.
How to Fix MBR FAQs:
1. What does rebuild MBR mean?
Rebuild MBR is a process to repair corrupted MBR Partition Table and restore the Master Boot Code so as to enable computer load and boot up Windows OS again.
Also, reinstalling Windows can fix this issue. But it's not convenient and even complex for Windows beginners. To rebuild MBR is easier and time-saving.
EaseUS Partition Master is featured with the function of rebuild MBR, so it will help you solve the MBR corruption issues very easily in a few clicks.
Free DownloadWindows 10/8.1/8/7/Vista/XP
2. Does delete MBR erase data?
If the MBR is deleted, the entire hard drive and data will be inaccessible. Generally, you can't directly access or see it in Windows File Explorer or in Disk Management. Also, to make the OS bootable, it's not allowed to edit or make any changes to it.
3. Where is the Master Boot Record MBR located?
The Master boot record is created when you first install Windows, on the first partition you create. The Master Boot Record is the first 512 bytes sector on your hard disk.
4. How to fix MBR error: Bootmgr is missing
Here are some quick fixes that you can try to fix "BOOTMGR is missing" error:
- Restart PC
- Reset all internal data and power cables
- Remove all removable media
- Change the boot order in BIOS
- Copy or recreate BCD file
- Repair corrupted MBR
For more detailed steps, you may refer to Fix BOOTMGR Is Missing in Windows 10/8/7 for help.
5. How to fix MBR error: Operating system not found
Try the listed fixes, you'll be able to make your PC bootable again from Operating System Not Found error:
- Check BIOS
- Reboot from a bootable disk
- Set BIOS to its default settings
- Rebuild MBR using CMD or partition manager software
- Set correct partition active
For a step-by-step guide, follow Missing Operating System for help.
- 윈도우10 정상종료 시 종료가 안 될 때
윈도우10 정상종료 시 종료가 안 될 때
절전에 관한 문제라 하던데요.
최대 절전모드는 사용하고 있긴 한데 그에 관련된 문제점인지 다른 것과 충돌 때문인지. 정확하게 잘 모르겠습니다.
MS의 설명을 보자면 이렇습니다.절전은 전력 소모가 거의 없고 PC 시작 속도가 빨라서 마지막으로 종료한 부분에서 즉시 이어서 작업할 수 있습니다. 배터리 잔량이 부족할 경우 Windows가 모든 작업을 자동으로 저장하고 PC를 끄기 때문에 사용자는 배터리 소모로 인한 작업 손실 걱정 없이 작업을 수행할 수 있습니다. 커피를 마시며 휴식을 취하는 경우와 같이 잠시 동안 PC를 사용하지 않을 경우 절전 모드를 사용합니다.
최대 절전 모드에서는 절전 모드보다 적은 전원을 사용하며 PC를 다시 시작하면 종료된 부분으로 돌아가지만 절전 모드만큼 빠르지는 않습니다. 이 옵션은 노트북용으로 설계되었으며 일부 PC에는 사용할 수 없습니다.
그냥 절전 기능만 써야 되겠다는 생각이 드네요.
해결 방법 ①최대 절전모드 해제 (cmd 검색 - 명령 프롬프트 관리자 권한 실행)
최대 절전 모드를 해제할 때 : powercfg.exe /hibernate off
최대 절전모드를 다시 사용하고 싶을 때 : powercfg.exe /hibernate on해결방법 ② 설정-시스템-전원 및 절전-추가 전원 설정-전원 단추 작동 설정-현재 사용할 수 없는 설정 변경-종료 설정의 빠른 시작 켜기(권장) 체크 해제
시작 - 설정 - 시스템
윈도우시작/설정

전원 및 절전 - 추가 전원 설정 - 전원 단추 작동 설정
 전원 및 절전 설정
빠른 시작 켜기에 체크되어 있을 텐데요. 현재 사용할 수 없는 설정 변경을 클릭합니다.
 제어판 전원옵션 시스템설정
종료 설정
빠른 시작 켜기(권장)을 체크 해제 - 변경 내용 저장


정상적으로 시스템 종료를 하고 모니터는 꺼졌는데 PC는 계속 켜져 있었던 문제를 해결했습니다.
출처: https://positive2357.tistory.com/104 [날고 싶은 긍정의 노트] - Digital COVID-19 Vaccine Record
- How to change font for checks and paychecks
https://quickbooks.intuit.com/learn-support/en-us/printing-topics/how-to-change-font-for-checks-and-paychecks/00/369831
How to change font for checks and paychecks
Overview
You can set up your preferred fonts for your checks and paychecks prior to printing them in QuickBooks Desktop.
Expected Outcome
You can change fonts for checks and paychecks.
Assumptions
You have an active QuickBooks Desktop payroll subscription.
Details
To change fonts for checks and paychecks from the Printer option:
- Go to the File menu and click Printer Setup.
- In the Form Name list, select Check/Paycheck.
- Click Fonts tab.
- Click Font button.
- Select your preferred font, font style and size.
- Click OK and OK again.
To change fonts for checks and paychecks from the Print Forms option:
- From the File menu, select Print Forms then click Check or Paycheck.
- In Select Checks or Paychecks screen, select the paycheck you would like to print.
- Enter check number in the Check Number field.
- Click OK to view the printing options.
- Click Fonts tab.
- Click Font button.
- Select your preferred font, font style and size.
- Click OK and OK again.
Note:
- You need click OK to close out of the windows after making your selections so that they are saved.
- You can also change the font for your address. Instead of clicking on the Font button in step 6 above, click on the Address Font button and select your preferred settings. The font for the numeric dollar amount is preset by QuickBooks Desktop to Arial 10 point font, and cannot be changed.
- Intuit Paystub Passwords
An employee's password are composed of:
- The first 4 characters of the employee's last name. These 4 characters are always lower case.
- The last four digits of the SSN.
An example is, Sandra Bullock's Social Security Number was 123-45-6789, her password to view the emailed pay stub would be bull6789. Please note that this is a system generated information and can't be disabled due to employee privacy issues.
For more insights about this matter, look into this article: https://quickbooks.intuit.com/community/Employees-and-payroll-taxes/Email-pay-stubs-from-QuickBooks-....
- What is the Green Card Number?
Green Card Number, Explained
A guide to the 90 characters on the back of your green card
What is the Green Card Number?
The green card number is an individualized number that U.S. Citizenship and Immigration Services (USCIS) used to track your case, prior to issuing the card.
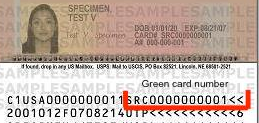
A green card seems pretty straightforward when you first look at it. That is, until you flip the card over and see 3 lines of 90 letters, numbers, and a whole slew of “less than” symbols on the back. Located within this string of characters is a lot of important information, including your green card number, which is unique to each green card holder.
In this guide:
Not sure if you qualify for a marriage-based green card?
Start by checking your eligibility.Where is the Green Card Number?
The green card number — also known as the receipt number or the permanent resident number — is located on the bottom of the back of the card, in the first line of a long string of 90 characters. The less than symbols are there simply as space holders.

With Boundless, you get the confidence of an independent immigration attorney who will review all of your materials and answer any questions you have — for no additional fee. Learn more about how we can help you, or get started now!
Green Card Location
Each line on the back of the green card contains 30 characters. The green card number is located in the last 13 characters of the first line, followed by two space holders. To be exact, the green card number is the characters for digits 16-28, followed by “>>.”
Boundless prints out all your forms and documents, assembled precisely how the government prefers. We mail the whole package to your doorstep, ready for you to sign and send to the correct government address. Ready to start?
Green Card Number Format
The first line of the 90 character string on the back of a green card starts with C1 or C2, which indicates whether the green card holder is a long-term permanent resident within the US (C1), or a permanent resident commuter, from Canada or Mexico (C2). Following are letters indicating the country of residence, USA, digits 3-5. The next ten digits (6-15) are called the alien number.
And then, finally, the green card number starts. This series begins with 3 letters, which indicate the service center which received the case for residency status:
CSC – California Service Center
EAC – Eastern Adjudication Center (now known as Vermont Service Center)
IOE – ELIS (efile)
LIN – Lincoln Service Center (now known as Nebraska Service Center)
MSC – Missouri Service Center (now known as National Benefits Center)
NBC – National Benefits Center
NSC – Nebraska Service Center
SRC – Southern Regional Center (now known as Texas Service Center)
TSC – Texas Service Center
VSC – Vermont Service Center
WAC – Western Adjudication Center (now known as California Service Center)
YSC – Potomac Service Center
After the service center code are two digits that represent the fiscal year the case was received. This might not match what your calendar says, because the U.S. government’s fiscal year runs from October 1 through September 30. As an example, this means a case received October 15, 2019 would have a fiscal year two digit code of 20.
Following the fiscal year are 3 digits indicating the computer workday of the year that the case was opened. But why 3 digits, for a weekday? It is based on 365/366 days per year, less holidays and weekends. So if your green card reads NBC 20 045, your case was received at the National Benefits Center in the 2020 fiscal year, on the 45th workday.
The last 5 is your unique immigrant case number — the number of the approved case that resulted in a green card being granted to you.
Together this string is the format of the green card number. If the case number for the example above was 51423, the full green card number would read: NBC2004551423.
Looking at the sample card in the image, for the woman named Test V. Specimen, her green card number reads: SRC0000000001.
If you’re wondering about the rest of the numbers, the second line includes your birth date in year-month-date (YY/MM/DD) format, gender, expiration date of the card (YY/MM/DD), a country of birth and some space holders. The third line will contain your last name, first name, father’s first initial, mother’s first initial, and more space holders if needed.
Boundless can help guide you through the entire marriage green card process. Read more about what you get with Boundless, or get started today.
- https://support.ooma.com/office/resetting-a-cisco-ip-phone/
https://support.ooma.com/office/resetting-a-cisco-ip-phone/
Resetting a Cisco IP Phone
IMPORTANT: These instructions should only be followed when it is requested by an Ooma Office Support Representative.
Make sure that the Cisco IP phone is connected to your local network and to the Internet using an Ethernet cable inserted on the SW port (bottom port) on the back of the phone.
While the Cisco IP phone is powered on, do the following:
- Press the Setup key (the one below the envelope key),
- Press [1][3], and
- Press the ok softkey.
The phone will restart. Once that process is complete, do the following:
- Press the Setup key (the one below the envelope key),
- Press [9], and
- Take note of the “Current IP” value that will follow this format: x.x.x.x (e.g. 192.168.1.2)
Using a computer on the same local network that the Cisco IP phone is connected to, open a web browser and enter the “Current IP” value that you noted above.
Then, click on [Admin Login]:
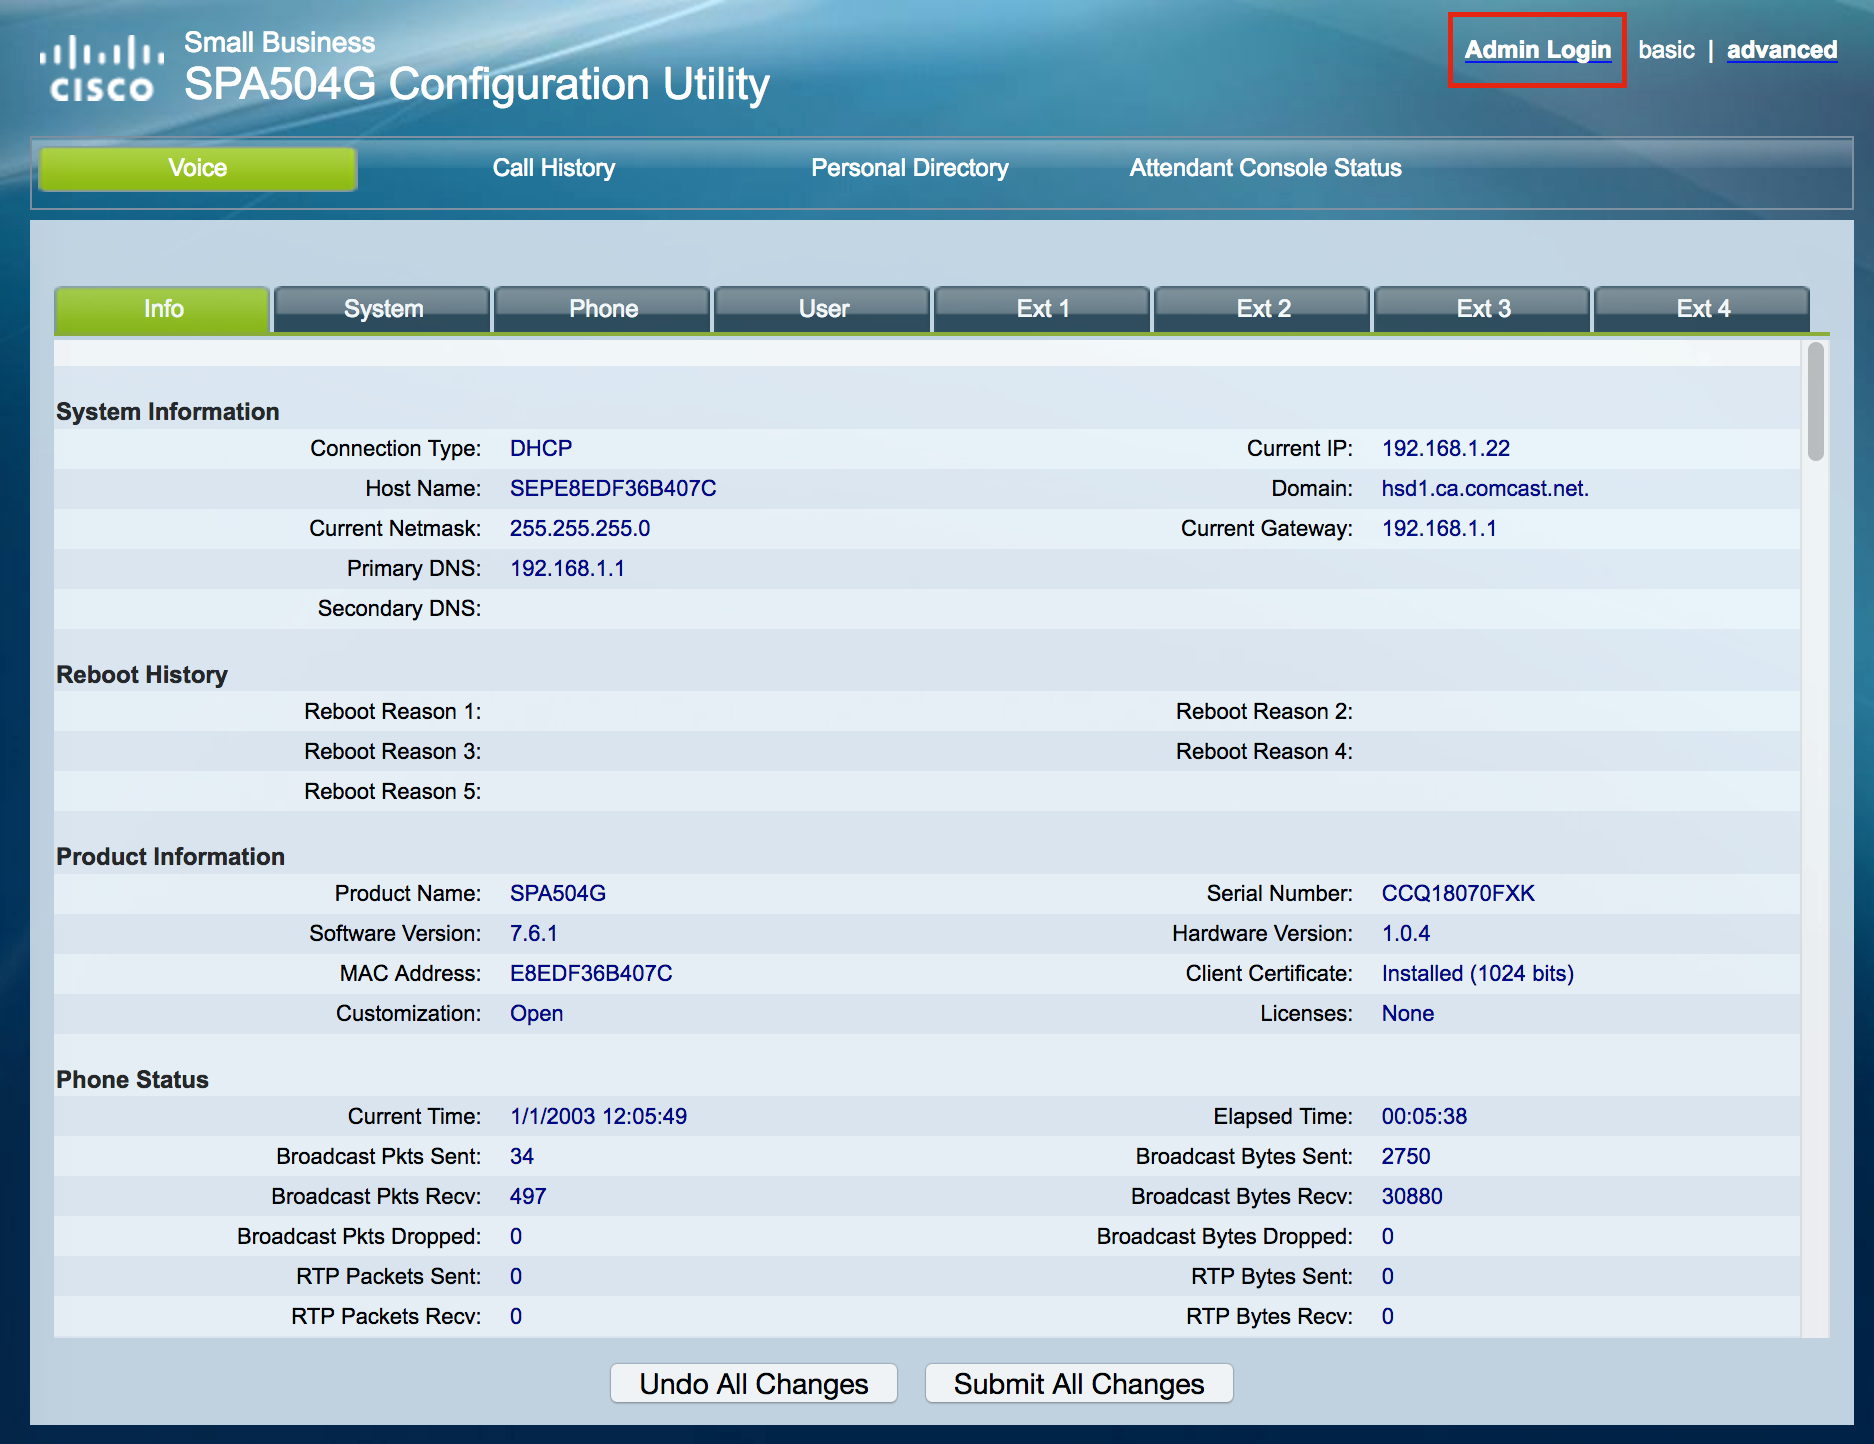
Click on [advanced]:
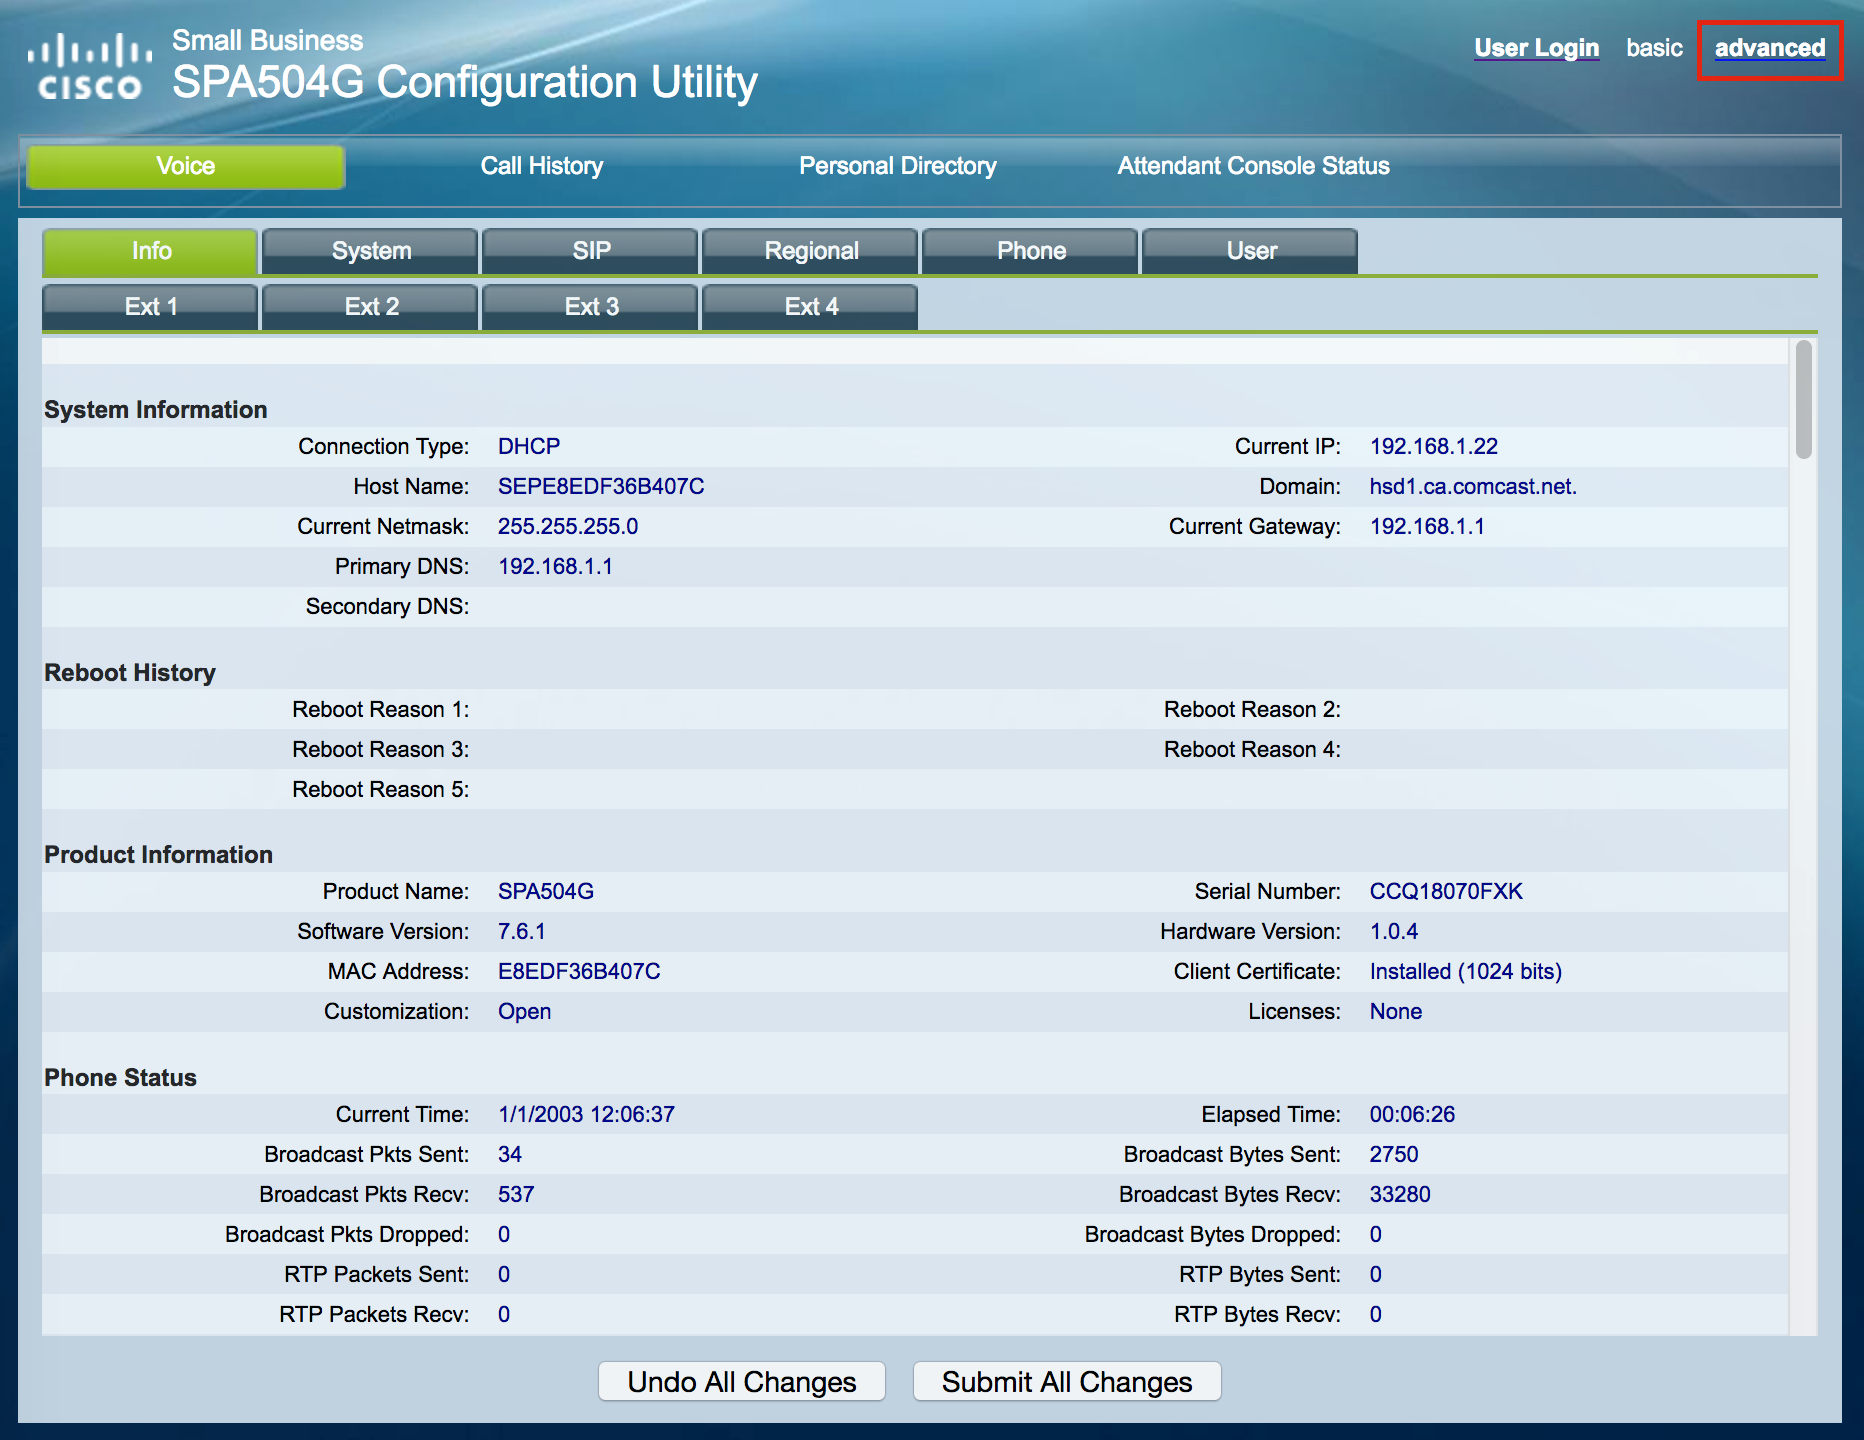
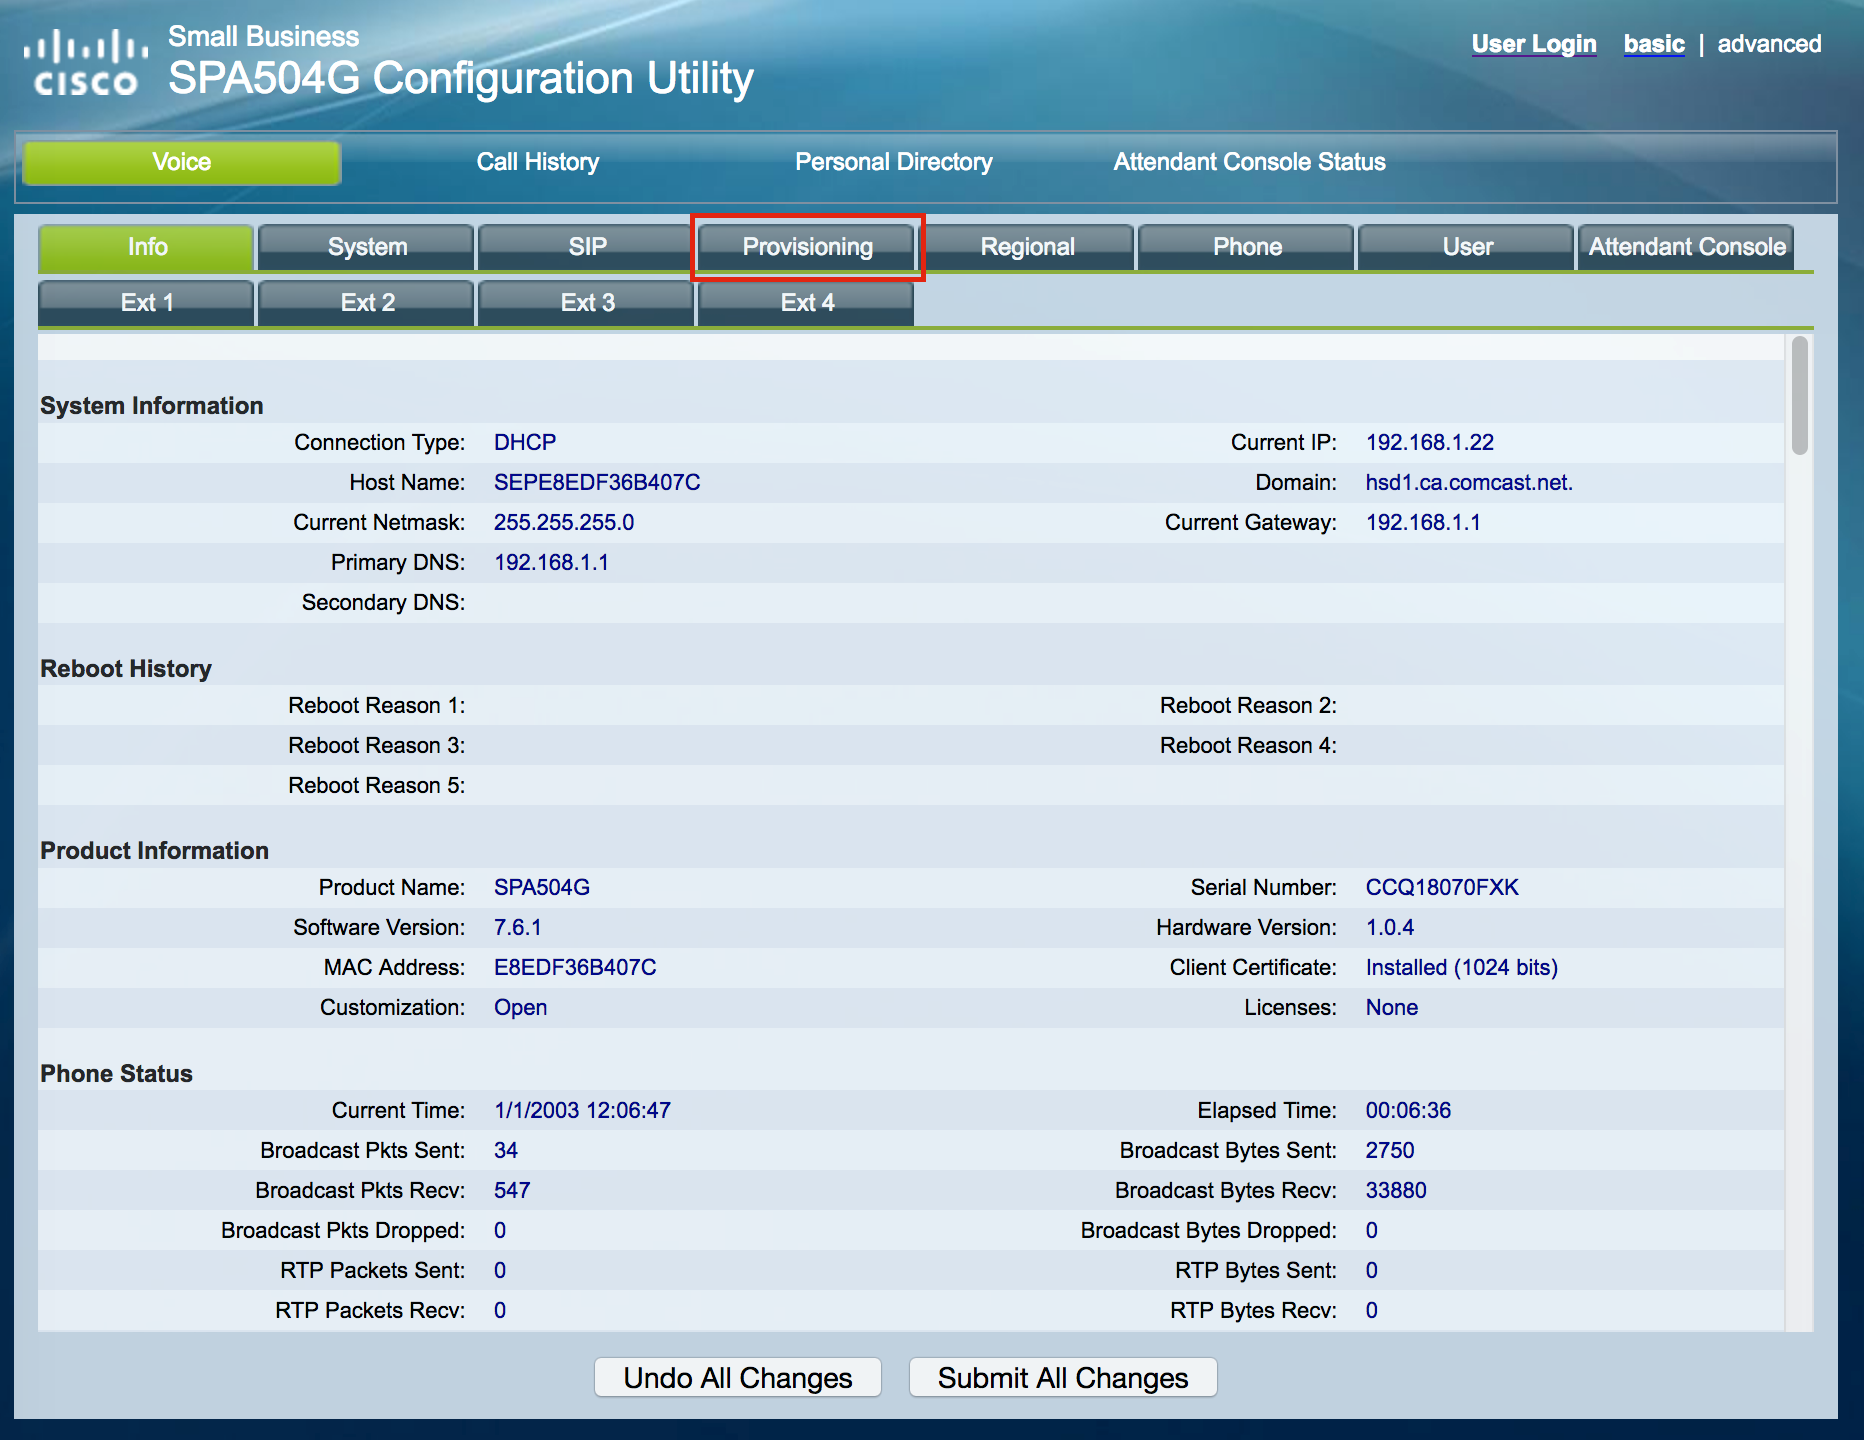
Click on [Provisioning]:
Enter the following values in the areas shown in the screenshot below:
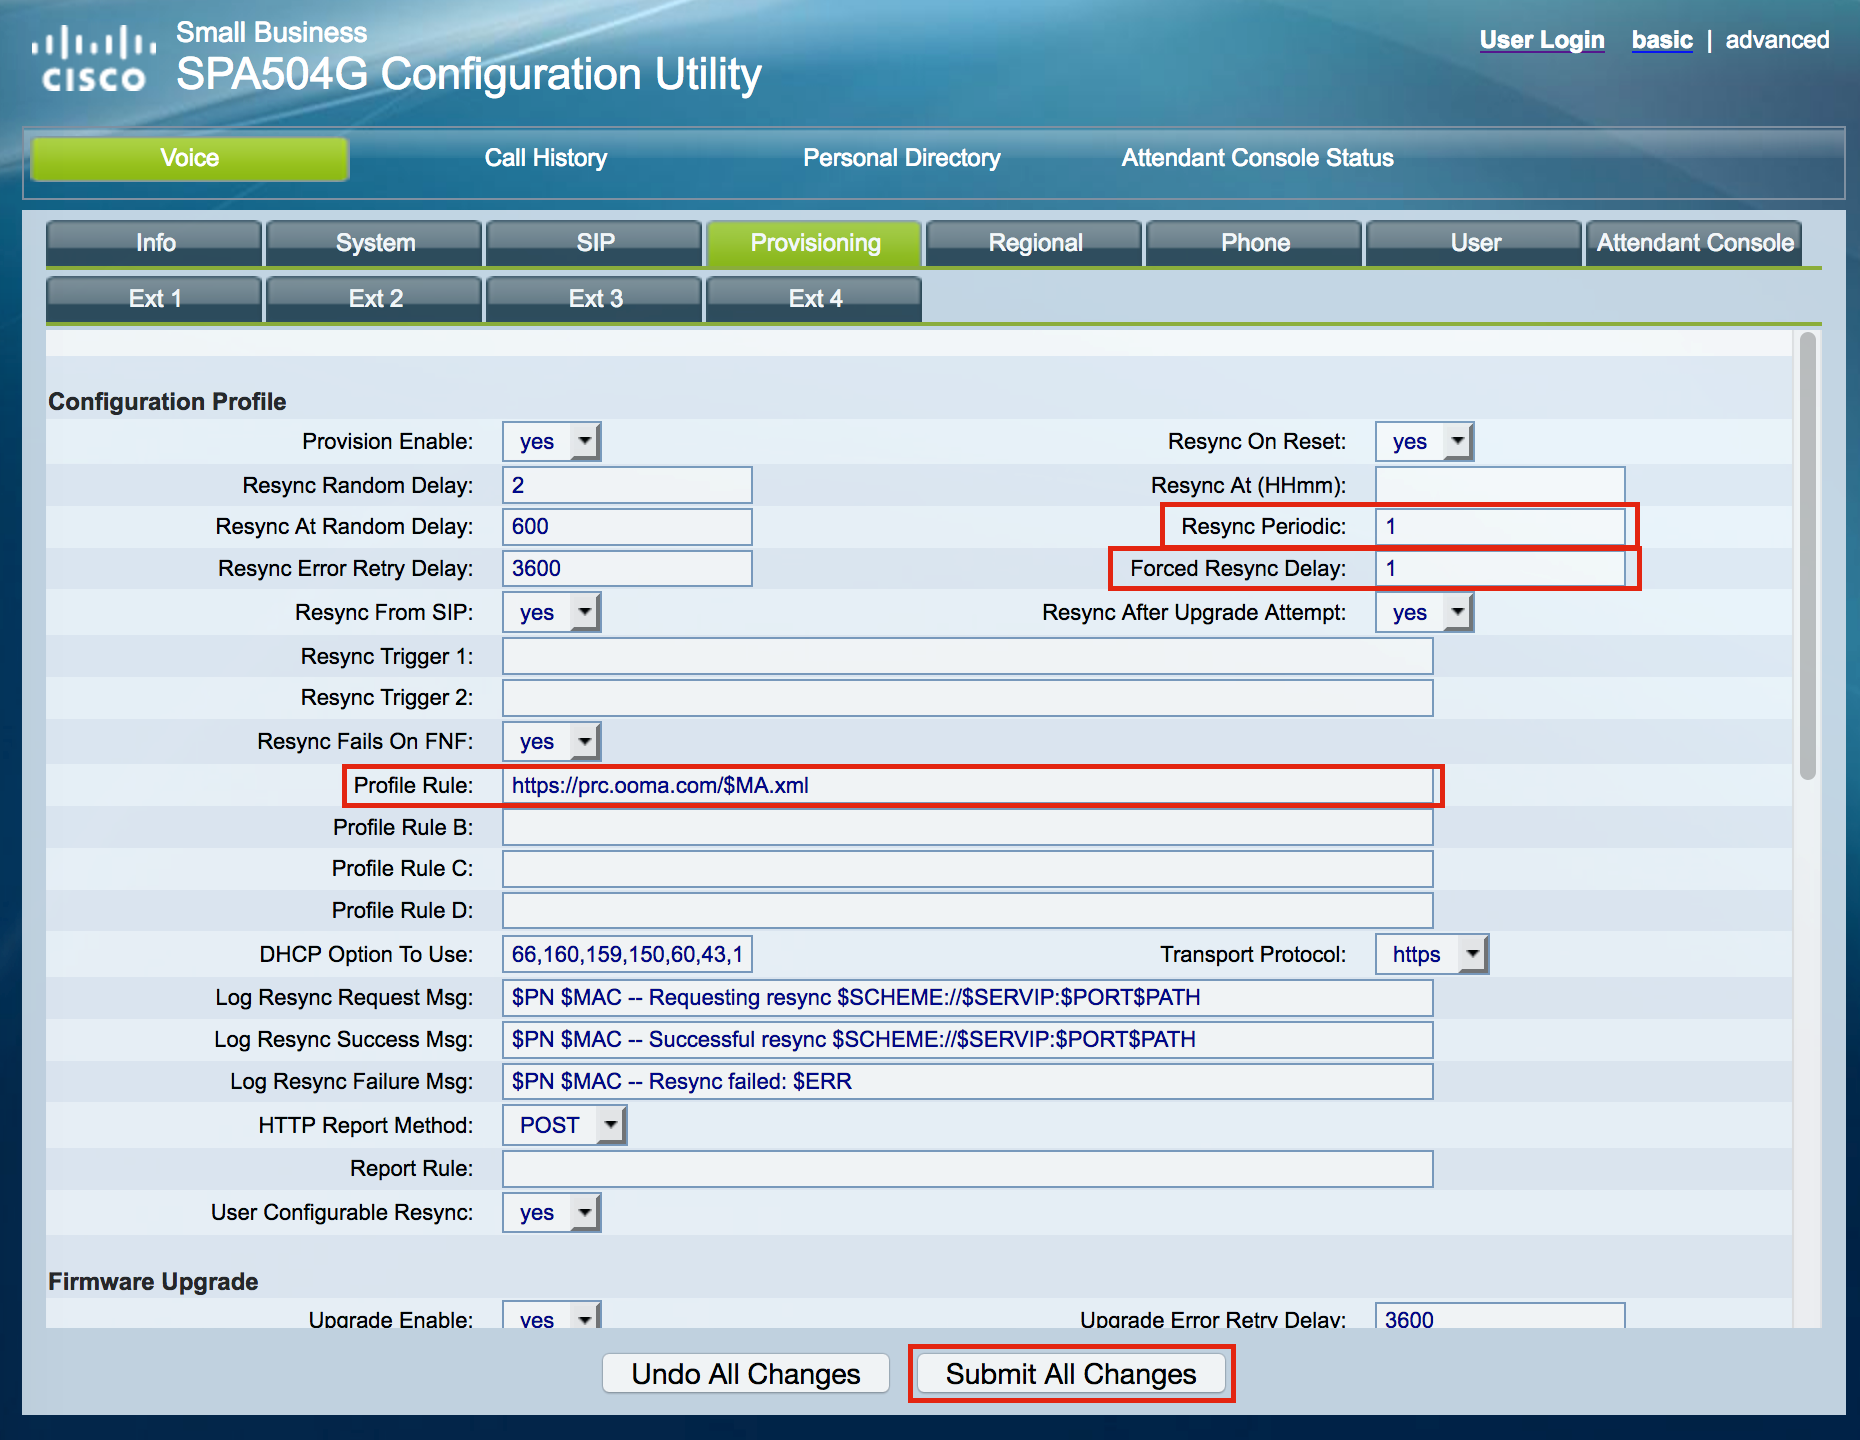
Resync delay: 1
Forced resync delay: 1
Profile rule: https://prc.ooma.com/$MA.xmlFinally, click on [Submit All Changes].
Your Cisco IP phone will automatically reboot several times. It will go into service in less than five minutes. If the phone does not go into service, please contact Ooma Office Customer Support again.
- Adobe Flash Player EOL General Information Page
https://www.adobe.com/products/flashplayer/end-of-life.html
Adobe Flash Player EOL General Information Page
Since Adobe no longer supports Flash Player after December 31, 2020 and blocked Flash content from running in Flash Player beginning January 12, 2021, Adobe strongly recommends all users immediately uninstall Flash Player to help protect their systems.
Some users may continue to see reminders from Adobe to uninstall Flash Player from their system. See below for more details on how to uninstall Flash Player.UPDATED: January 13, 2021
1. WHEN IS THE FLASH PLAYER END-OF-LIFE (EOL)?
2. WHY DID ADOBE DECIDE TO EOL FLASH PLAYER AND SELECT THE END OF 2020 DATE?
3. WHAT DOES FLASH PLAYER EOL MEAN?
4. WHY SHOULD I UNINSTALL FLASH PLAYER FROM MY SYSTEM?
5. HOW DO I UNINSTALL ADOBE FLASH PLAYER?
6. WHY IS ADOBE BLOCKING FLASH CONTENT FROM RUNNING IN FLASH PLAYER BEGINNING JANUARY 12, 2021 ?
7. WHICH BROWSERS AND OPERATING SYSTEMS CURRENTLY SUPPORT ADOBE FLASH PLAYER?
8. WILL ADOBE MAKE PREVIOUS VERSIONS OF ADOBE FLASH PLAYER AVAILABLE FOR DOWNLOAD AFTER 2020?
9. IF I FIND FLASH PLAYER AVAILABLE FOR DOWNLOAD ON A THIRD-PARTY WEBSITE, SHOULD I USE IT?
10. WILL ADOBE PROVIDE SECURITY UPDATES FOR FLASH PLAYER AFTER THE EOL DATE?
- Register.com email setting
How Do I Get Started with POP3 and IMAP?
Important: These instructions are for initial set up of your email service with an email client or device. For instructions to change existing mail settings, please click here
If you have recently received an email requesting changes to your email settings or logging into webmail login page, please click here.POP3 and IMAP are protocols that allow you to use your favorite email software to manage your email. Most computers and mobile devices have a mail program built into their operating system. There are other options as well, such as Outlook, if you do not want to use any of the included programs.
For additional information, please review the FAQs for Windows, MAC, and Mobile at the bottom of this page.- What Settings Do I Need to Set Up POP3 and IMAP?
- How Do I Set Up My Specific POP3/IMAP Software or Device?
- How many Number of Connections is Allowed per IP Address?
How Do I Set Up My Specific POP3/IMAP Software or Device?
Select the table with your brand of product—Windows, MAC, or Mobile. Then, click your product link for setup instructions and FAQs for the software or device that you are using.
Note: If the device or software is not listed below, please consult the manufacturer of the device or software and utilize the settings in the table above.
Important: At this time, the automatic setup feature for email boxes is only available to Network Solutions® customers.
Mac
If you have this Mac Email version Then click the link to consult the following setup article  Mac Mail
How Do I Set Up Email on My Mac?  Outlook 11
How Do I Set Up Outlook 2011 Mail?  Entourage
How Do I Set Up Entourage on My Mac? Windows
If you have this Windows Email version Then click the link to consult the following setup article  Outlook 2019
Outlook 2019 Support  Outlook 2016
Outlook 2016 Support  Outlook 2013
Outook 2013 Support  Outlook 2010
Outlook 2010 Support  Windows Live Mail
Windows Live Mail Support  Windows 8 Mail
Windows 8 Mail Support  Windows 10 Mail
Windows 10 Mail Support  Mozilla Thunderbird
Mozilla Thunderbird Support Mobile
If you have this mobile device Then click the link to consult the following setup article  iPhone/iPad
iPhone or iPad  Android
Android  Windows Phone
Windows Phone Support What Settings Do I Need to Set Up POP3 and IMAP?
Use the following table to help identify the information needed for setting up a POP3 or IMAP account:
Note: The following settings are for Web.com and Network Solution customers except where stated otherwise.
Settings POP IMAP Email Address The Email address you are setting up The email address you are setting up Incoming Mail Server mail.<yourdomainname.com>
Example: mail.webemailhelp.commail.<yourdomainname.com>
Example: mail.webemailhelp.comOutgoing Mail Server
(SMTP)smtp.<yourdomainname.com>
Example: smtp.webemailhelp.comFor Register.com customers:
mail.<yourdomainname.com>
Example: mail.webemailhelp.comsmtp.<yourdomainname.com>
Example: smtp.webemailhelp.comFor Register.com customers:
mail.<yourdomainname.com>
Example: mail.webemailhelp.comUsername Your Full Email Address
Example: help@webemailhelp.comYour Full Email Address
Example: help@webemailhelp.comPassword The password you set when you created the mailbox The password you set when you created the mailbox. Incoming Server Port 110 143 Outgoing Server (SMTP) Port 587 587 Outgoing Server (SMTP) requires authentication Yes —Your Full Email address and Password Yes—Your Full Email address and Password TLS (optional) No Yes Note: For newly registered domain names, it may take up to 48 hours for your settings to activate. If you have just configured the mailbox, it may take up to 4 hours for the mailbox to be fully functional.
How many Number of Connections is Allowed per IP Address?
Our system will only allow up to 25 connections to IMAP at one time per IP. This means that if an office wants to use us instead of an exchange server, they can't have more than 25 concurrent users unless each system has it's own public IP address. Some mail clients use at least two or more IMAP connections per mailbox.
I received a notice to update my email settings or webmail login page:
To update your email settings:
- You will need to make two changes to your current email settings. Change your:
- Incoming Mail Server to: mail.‹yourdomain.extension›
- Outgoing Mail Server to: smtp.‹yourdomain.extension›
To update your webmail login page:
- Log into your webmail service directly. You'll need to use the url mail.‹yourdomain.extension› and replace any existing bookmarks with this new login location.
- For example, if your domain name is webmail.info, then your login url and Incoming Mail Server setting would be mail.webmail.info
- First Draw PPP Loans
How and when to apply
Small businesses and non-profits with fewer than 20 employees and sole proprietors can apply for Second Draw PPP loans from February 24 through March 9, 2021. The program will be open to all eligible entities March 10 through March 31, 2021.
Lender Match can help connect you with a lender. You can also view all lenders near you on a map. All new First Draw PPP Loans will have the same terms regardless of lender or borrower.
If you wish to begin preparing your application, you can download the following PPP borrower application form to see the information that will be requested from you when you apply with a lender:
- Paycheck Protection Program First Draw Borrower Application Form (updated 03-03-21)
- Paycheck Protection Program First Draw Borrower Application Form for Schedule C Filers Using Gross Income (published 03-03-21)
Supplemental materials
- Top-line Overview of PPP First Draw Loans
- Frequently Asked Questions for Lenders and Borrowers (updated 03-03-21)
- How to Calculate First Draw PPP Loan Amounts and What Documentation to Provide - by business type (01-17-21)
- Borrower’s Disclosure of Certain Controlling Interests (01-19-21)
- Frequently Asked Questions for Faith-Based Organizations Participating in the PPP and Economic Injury Disaster Loan Program
- PPP Myth vs. Fact
- Cross program eligibility on SBA coronavirus relief options
Affiliation rules
- PPP First Draw Borrower Application Form - Schedule C Filers Using Gross Income
SBA FORM
2483-C
PPP First Draw Borrower Application Form - Schedule C Filers Using Gross Income
Effective Mar 3, 2021
DOWNLOAD .PDF
Paycheck Protection Program First Draw Borrower Application Form for Schedule C Filers Using Gross Income
Borrower Application 2483-C.pdf (sba.gov)
Published 03-03-21
An applicant may use this form only if the applicant files an IRS Form 1040, Schedule C, and uses gross income to calculate PPP loan amount
- 1099 Form의 종류
1099 Form의 종류
1099-A: 모기지 렌더가 당신의 빚을 포기해주기로 했거나 집이 숏세일이 되었다면 받을 수 있는 폼으로 납세자는 탕감된 부채를 과세수익으로 IRS에 보고해야 합니다.
1099-B: 주식이나 증권거래를 해서 수익이 있을경우 받는 폼입니다.
1099-C: 만일 크레딧카드 회사에서 부채 일부를 탕감받아 settle down 했다고 하더라도 그 탕감받은 부채는 여전히 과세수익으로 보고해야 하며 이때 받는 폼입니다.
1099-DIV: 배당금을 받았을때 보고하는 수입보고 서류입니다. 다만 크레딧유니언에서 받은 배당금은 IRS는 이자로 보고 있으며 따라서 1099-INT로 보고해야 합니다.
1099-G: 정부에서 세금리펀드나 크레딧, 혹은 실업수당등을 받았을 경우 수입을 보고하는 서류입니다.
1099-INT: 만일 은행이나 브로커등의 금융기관에서 $10이상의 이자를 받았을경우 보고하는 서류입니다.
1099-LTC: 만일 보험사에서 롱텀케어 보상을 받았을경우 보험사는 1099-LTC폼을 받을 수 있습니다.
1099-NEC: 기업이나 단체에서 사람을 고용하여 지불을 했을때 보내는 서류로 지금까지는 1099-MISC로 보고했으나 2021년에는 1099-NEC로 보고해야 합니다. 따라서 프린랜서로 일을 하거나 독립계약자들은 내년부터는 이 폼으로 수익을 보고해야 합니다.
1099-OID: 채권이나 노트등을 보유했을 경우 은행이나 금융기관에서 이자소득으로 발행하는 서류입니다.
1099-PATR: co-op에 속해있어 배당금을 $10이상 받았을 경우 보고해야 하는 서류입니다.
1099-Q: 자녀의 학자금을 위해 세이빙한 529플랜등에서 돈을 받았을 경우 보고하는 서류로 적격한 학자금으로 사용했을 경우 면세이며 자료보관용입니다.
1099-R: 펜션플랜이나 연금에서 받은 수익비용을 보고하는 서류입니다. 대부분의 연금플랜은 세금 면제가 되는 경우가 많습니다.
1099-S: 주택등 부동산 판매수익에 대한 보고용 서류이나 거주용 주택의 경우 세금이 면제되는 경우에 대해 확인을 하시기 바랍니다.
1099-SA: Health Saving Account에서 받은 수익에 대한 보고서류로 만일 해당 비용을 적격한 의료비로 사용했다면 면세됩니다.
1099-MISC: 이 외 모든 수익에 대한 보고를 하는 폼으로 지금까지는 일반적으로 프리랜서나 독립계약자들이 가장 많이 받는 수익증빙서류입니다.
- Activating the Modem
https://www.spectrum.net/support/internet/activating-new-modem-t?redirected=true
Activating a Modem
There’s high demand for new equipment during this national emergency. Delivery of self-install kits may take longer than expected. Set your communication preferences to receive confirmation and tracking number(s) when your equipment has shipped.
You can:
- Activate a Spectrum modem for new Internet service or as a replacement for an existing modem.
- Activate your own modem for new Internet service.
- Activate your own modem as a replacement for an existing modem.
If you’re using your own modem, make sure it’s compatible with the Spectrum network and your Internet speed tier.
Note: If you have Spectrum Voice service, a Spectrum Voice modem is required.
Before You Begin
Make sure you have the following information handy:
- The primary phone number on your Spectrum account or your Spectrum account number.
- The ZIP code for your service address.
- If you’re installing your own modem, you’ll also need:
- The MAC address of the equipment you want to activate.
- The modem manufacturer and model number for verification.

Connecting the Modem
The modem must be connected before you begin the activation process.
- Refer to your Spectrum self-installation kit for setup instructions.
Note: If you’re replacing an existing modem, simply move the coax cable from the old modem to the new modem and connect the new modem to an electrical outlet for power.
- Wait for the modem to connect to the network (about two to five minutes). You’ll know it’s connected when the online status light on the front of the modem is solid. Now you’re ready to activate your new modem.
Activating the Modem
- Visit the activation website (available in some areas) listed in your self-installation kit instructions from your computer or smartphone
OR - If the website is not available, call (877) 309-5869.
Activating Your Own Modem for New Internet Service
- If you provided your purchased modem’s MAC ID at the time you ordered Spectrum Internet, you may be connected and ready to begin using the internet. Try going to Spectrum.net to confirm your internet is working.
- If you didn’t have your purchased modem’s MAC ID at the time you ordered Spectrum Internet, you may be able to enter the MAC ID on the activation website.
- If the website is not available, call (877) 309-5869.
- Set or remove reminders
Set or remove reminders
Outlook for Microsoft 365 Outlook 2019 Outlook 2016 Outlook 2013 Outlook 2010 More...
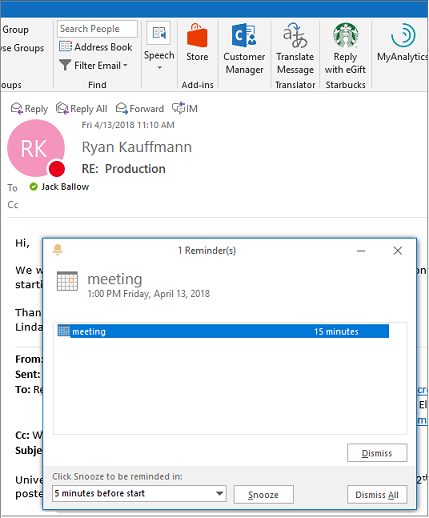
Outlook reminders will pop up over your email or calendar to let you know a scheduled event is about to start.
Newer versionsOffice 2010Office 2007
Show reminders over other programs or apps
You can set up Outlook to display your reminder window on top of other programs you're working in.
-
Select File > Options > Advanced.
-
In the Reminders section, check the box marked Show reminders on top of other windows.

-
Click OK.
Note: This feature is not available for Outlook 2013 or Outlook 2016. For Microsoft 365 subscribers, this version is available if you are on Version 1804 (Build 9226.2114) or higher.
Add or remove reminders for meetings
Set reminders for all new meetings
Set a reminder for an existing meeting
Automatically dismiss reminders for past events
If you don't want to see reminders for events in the past, you can tell Outlook to automatically dismiss reminders for past events. For example, if you're out of the office for three days, you might not want to come back and see reminders for the meetings that took place while you were gone.
-
Select File > Options > Advanced.
-
In the Reminders section, select Automatically dismiss reminders for past events.
Set reminders for email messages
-
At the bottom of the screen click Mail.

-
Select an email message.
-
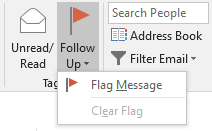
Click Home > Follow Up > Add Reminder.
-
In the Custom dialog box, check or uncheck Reminder.
Set reminders for tasks
-
At the bottom of the screen, click Tasks.

-
To view the tasks, click Home >To-Do List.

-
Click a task in the list.
-
Do one of the following:
-
To add a task reminder to your Tasks list, select the task and then in the Follow-up group, choose a time frame to meet your deadline.
-
To remove a task reminder from your Tasks list/To-Do list, in the Manage Task group, click Remove from List.
-
-
- SBA 웹사이트에서 다운로드 가능한 신청서
- Verify Your Identity with ID.me THIS SITE IS FOR UNEMPLOYMENT CLAIMANTS WHO ARE REQUIRED TO VERIFY THEIR IDENTITY FOR THEIR CLAIM.
Verify Your Identity with ID.me
THIS SITE IS FOR UNEMPLOYMENT CLAIMANTS WHO ARE REQUIRED TO VERIFY THEIR IDENTITY FOR THEIR CLAIM.
https://hosted-pages.id.me/california-edd-identity-proofing
- CMS - DVR Remote Software
- Recover your account We can help you reset your password and security info. First, enter your Microsoft account.
Recover your account
We can help you reset your password and security info. First, enter your Microsoft account.
https://account.live.com/password/reset?uiflavor=xbox360&id=292543
- Console AVG
https://id.avg.com/sso?target=https%3A%2F%2Fconsole.avg.com%3A443%2F#/sign-in
- PPP Forgiveness 3508EZ and 3508S Korean Form
https://www.sba.gov/sites/default/files/2020-07/PPP%20Loan%20Forgiveness%20Application%20Form%20EZ%20Instructions%20%28Revised%2006.16.202...%29_Korean.pdf
https://www.sba.gov/sites/default/files/2020-10/PPP%20Loan%20Forgiveness%20Application%20Form%203508S_korean_508.pdf
링크를 누르시면 해당 폼이 한국어로 제공 됩니다.
필요한 사항을 기입 하여 보내주십시요. - 정확한 사진을 찍어 보내셔야합니다.
