
FAQ
Frequently Asked Questions
- Verify Your Identity with ID.me THIS SITE IS FOR UNEMPLOYMENT CLAIMANTS WHO ARE REQUIRED TO VERIFY THEIR IDENTITY FOR THEIR CLAIM.
Verify Your Identity with ID.me
THIS SITE IS FOR UNEMPLOYMENT CLAIMANTS WHO ARE REQUIRED TO VERIFY THEIR IDENTITY FOR THEIR CLAIM.
https://hosted-pages.id.me/california-edd-identity-proofing
- CMS - DVR Remote Software
- Recover your account We can help you reset your password and security info. First, enter your Microsoft account.
Recover your account
We can help you reset your password and security info. First, enter your Microsoft account.
https://account.live.com/password/reset?uiflavor=xbox360&id=292543
- Console AVG
https://id.avg.com/sso?target=https%3A%2F%2Fconsole.avg.com%3A443%2F#/sign-in
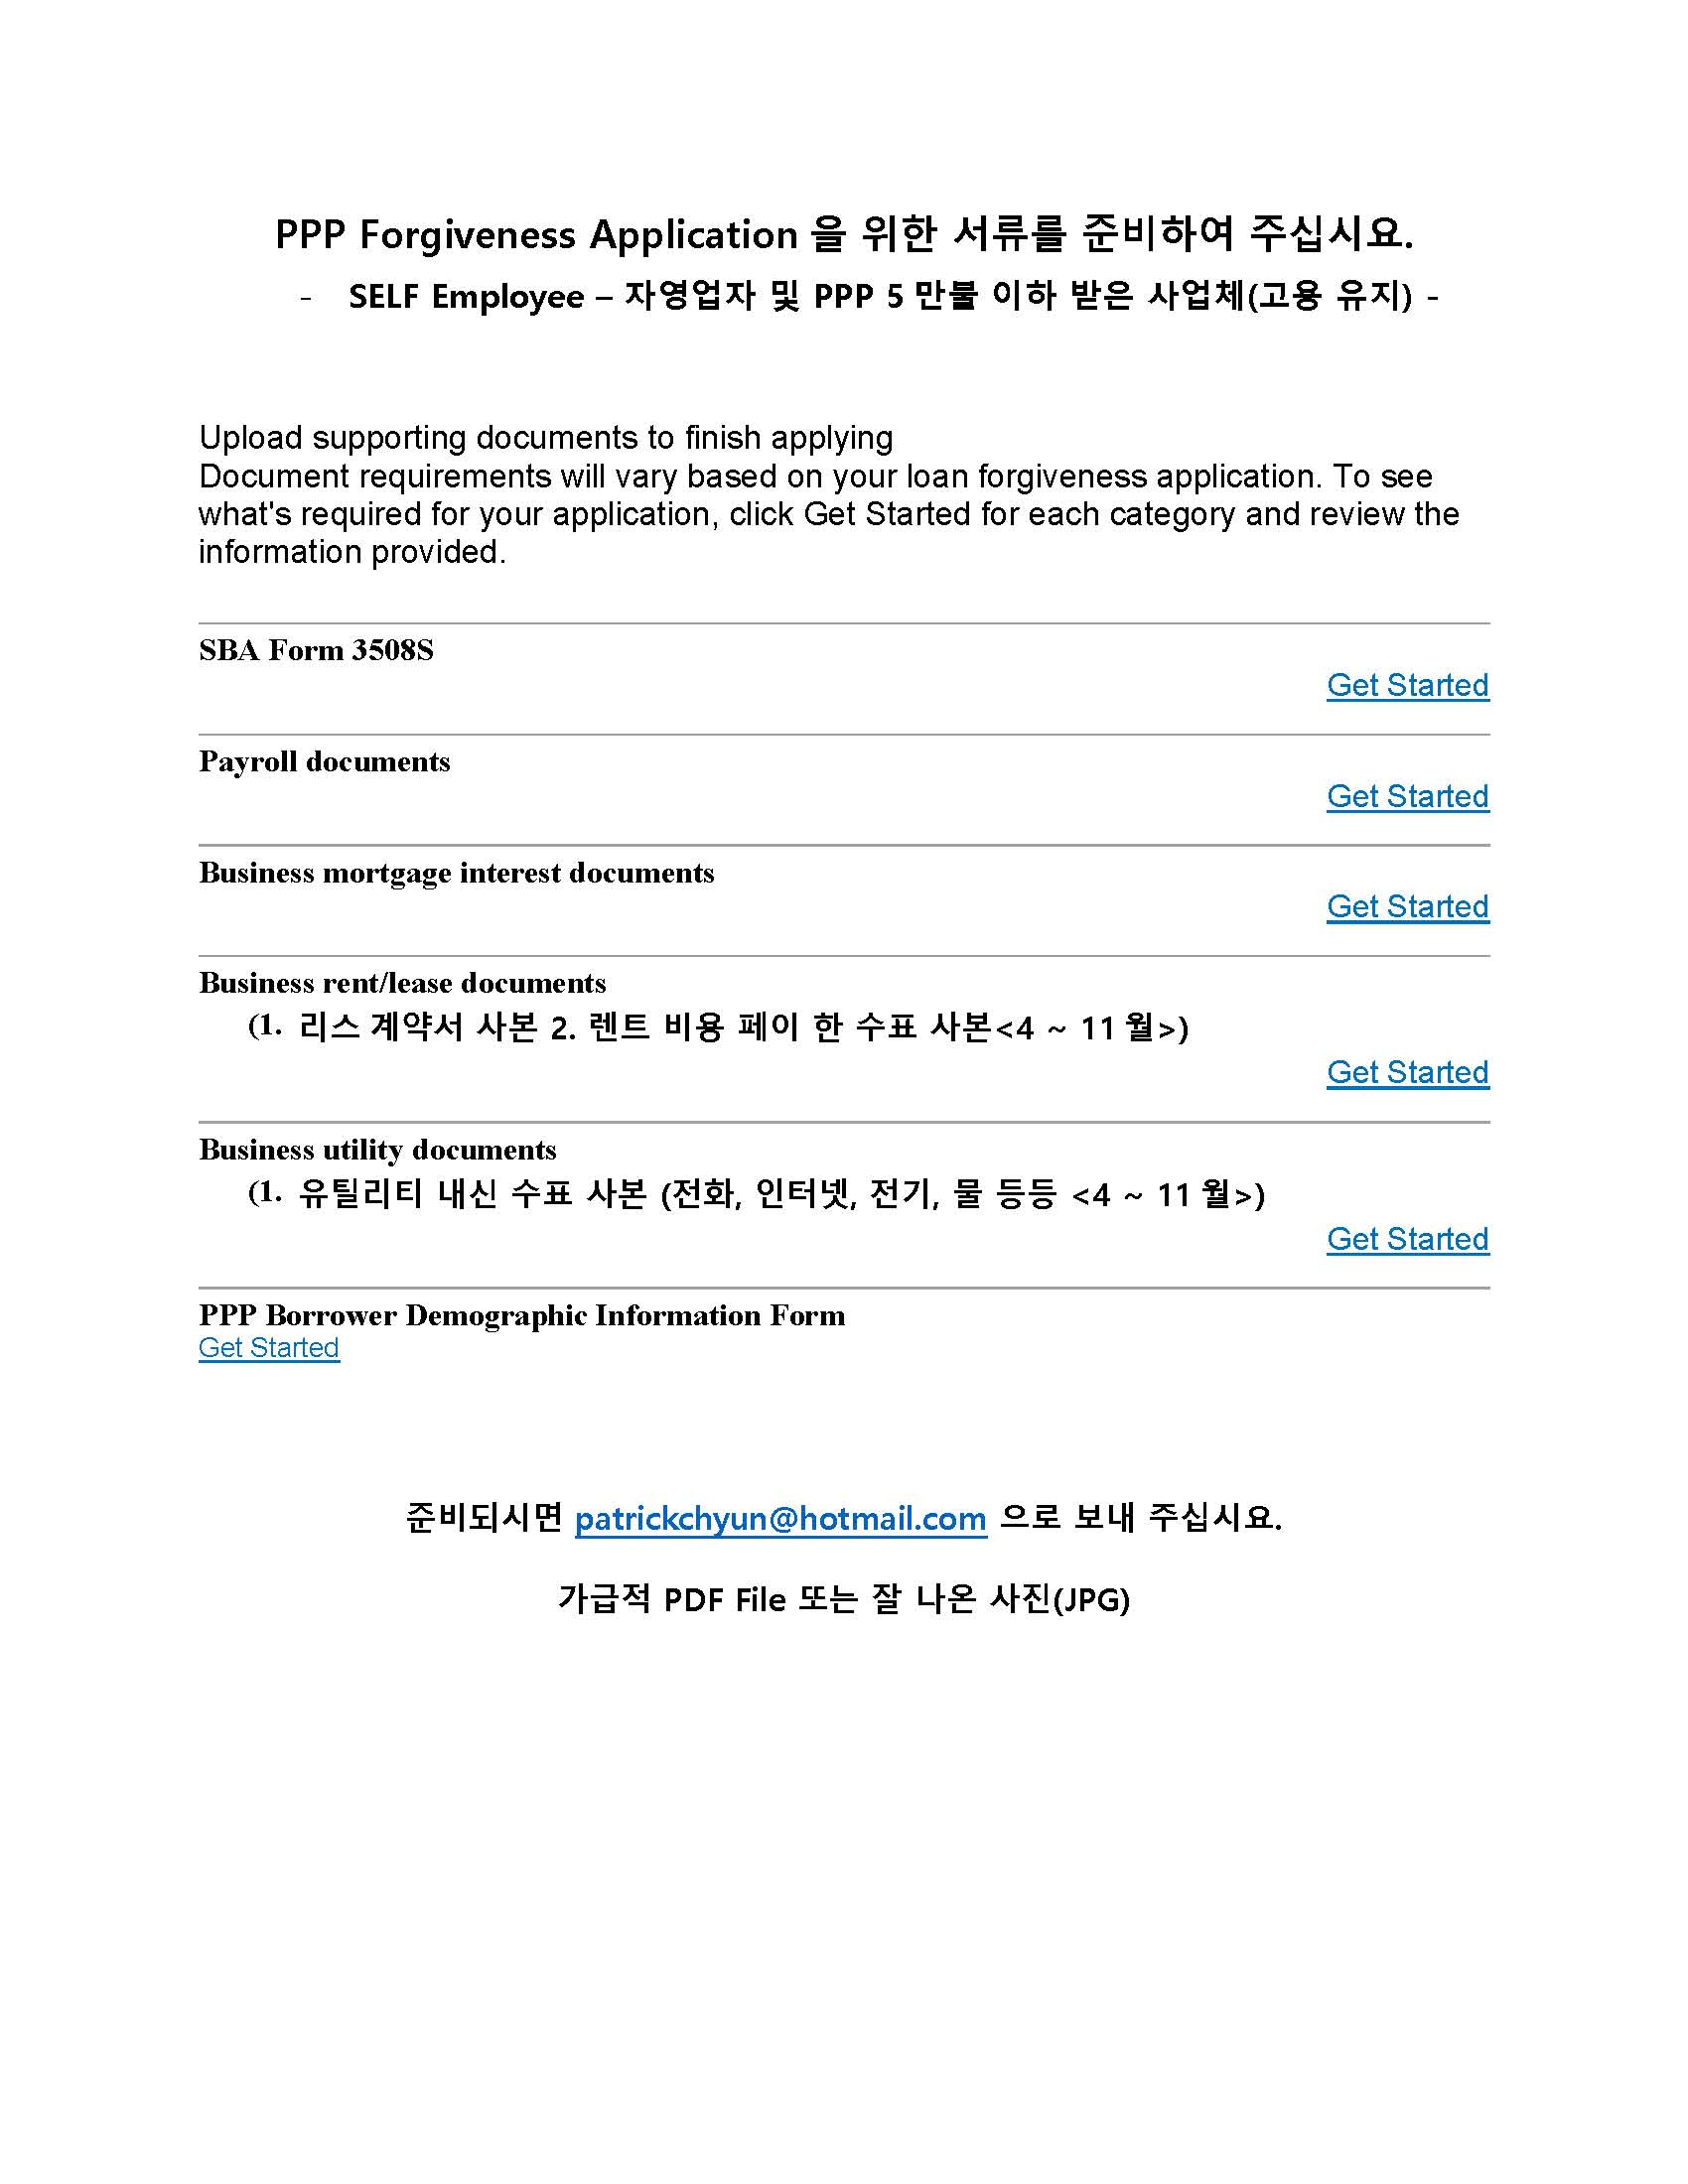
- PPP Forgiveness 3508EZ and 3508S Korean Form
https://www.sba.gov/sites/default/files/2020-07/PPP%20Loan%20Forgiveness%20Application%20Form%20EZ%20Instructions%20%28Revised%2006.16.202...%29_Korean.pdf
https://www.sba.gov/sites/default/files/2020-10/PPP%20Loan%20Forgiveness%20Application%20Form%203508S_korean_508.pdf
링크를 누르시면 해당 폼이 한국어로 제공 됩니다.
필요한 사항을 기입 하여 보내주십시요. - 정확한 사진을 찍어 보내셔야합니다.
- Language Accessory Pack for Office
- PPP Loan Forgiveness Form 3508S
https://www.sba.gov/document/sba-form-3508s-ppp-loan-forgiveness-form-3508s
PPP Loan Forgiveness Form 3508S
Effective Oct 31, 2020
DOWNLOAD .PDF
SBA Form 3508S
Updated 10-31-20 with a new expiration date
A BORROWER MAY USE THIS FORM ONLY IF THE BORROWER RECEIVED A PPP LOAN OF $50,000 OR LESS.
A Borrower that, together with its affiliates, received PPP loans totaling $2 million or greater cannot use this form. - How to Delete QuickBooks Online data and start from scratch
Let me walk you through deleting your QuickBooks Online data and start a new one.
You can purge your data if your account aged is less than 60 days. Please keep in mind that this process only works for QuickBooks Online Plus and Essentials. The system deletes all data entered into the company, and you're unable to restore or reverse them.
To purge the data, follow the steps listed below:
- Log in to your QuickBooks Online account.
- Change the URL to include /purgecompany.
- Example: URL shows https://qbo.intuit.com/c28/app/homepage, change to: https://qbo.intuit.com/c28/app/purgecompany.
- The next screen will provide a summary of the items to be deleted.
- Type the word “YES” once the data gets deleted, then click OK.
- Click Wipe Data once your selections are complete.
- Once the deletion is complete, you will be rerouted to your home page.
If not, you need to cancel your account, and start a new subscription.
To cancel your account:
- Sign in to your QuickBooks Online company at https://qbo.intuit.com.
- Go to the Gear icon at the top.
- Go to Your Account, choose Update Credit Card.
- In the Subscription Status section, click the Cancel Subscription link.
- Follow the on-screen prompts and it'll walk you through the rest of the process.
To start a new account:
- Go to https://quickbooks.intuit.com/choose-country/.
- Fill up the User ID and password.
- You can use the same user ID and a password you previously had. If you activated payroll in the account, this is the best option for you.
You can read through this article for additional information: Delete QuickBooks Online data and start from scratch.
That will provide you with information about your concern.
Let me know how everything turns out by leaving a comment below. I'm always around if you need help.
- Switching out of S mode in Windows 10
Here's How:
1 Open Settings, and click/tap on the Update & Security icon.
2 Click/tap on Activation on the left side, and click/tap on the Go to the Microsoft Store link under the Switch to Windows 10 <current edition> section on the right side. (see screenshot below)
The <current edition> (ex: Home) of Windows 10 will be the same as what you currently have in S mode.

3 Click/tap on the Get button on the Switch out of S mode page in the Microsoft Store app. (see screenshot below)
4 Click/tap on the Install button when ready to start switching out of S mode. (see screenshot below)
5 When prompted, click/tap on Yes, let's go to confirm. (see screenshot below)
6 You will now switch out of S mode silently in the background until finished (not long). Restarting the computer is not required.
Switching out of S mode in Windows 10
Windows 10 in S mode is designed for security and performance, exclusively running apps from the Microsoft Store. If you want to install an app that isn't available in the Microsoft Store, you'll need to switch out of S mode. Switching out of S mode is one-way. If you make the switch, you won't be able to go back to Windows 10 in S mode. There's no charge to switch out of S mode.
-
On your PC running Windows 10 in S mode, open Settings > Update & Security > Activation.
-
In the Switch to Windows 10 Home or Switch to Windows 10 Pro section, select Go to the Store. (If you also see an "Upgrade your edition of Windows" section, be careful not to click the "Go to the Store" link that appears there.)
-
On the Switch out of S mode (or similar) page that appears in the Microsoft Store, select the Get button. After you see a confirmation message on the page, you'll be able to install apps from outside of the Microsoft Store.
-
- Solar tax credit
https://www.solar-estimate.org/residential-solar/solar-incentives/federal-solar-tax-credit
What is the solar tax credit?
Last updated on January 01, 2020 by Scott Nelson
The federal solar tax credit, formally known as the solar Investment Tax Credit (ITC), is a credit equal to 26% of the qualified system costs of installing a photovoltaic (PV) solar system. The ITC was established as a part of the Energy Policy Act of 2005 in an effort to boost the US renewable energy market.
How does it work?
The total value of the solar tax credit can easily be calculated by taking 26 percent of the solar system installation cost. There is no limit to the value of the credit. Example:
If your residential solar energy system costs $20,000 and is installed in 2020, your tax credit would be $20,000 x 26% = $5,200.
It’s important to note that the federal solar tax credit is a nonrefundable tax credit. This means that you only get a refund up to the amount you owe in federal taxes. Example:
If you owed $5,000 in federal taxes and had a $6,000 solar tax credit, you would take $5,000 of the credit in the first year, and then carry over the remaining $1,000 of the credit to the following taxable year.
The solar tax credit is only available for the owner of the system. Therefore, homeowners with a PV system through a Solar Lease or PPA (Power Purchase Agreement) are not personally eligible for the solar ITC.
- 삼성 노트- 전원 및 배터리 방전 > 전원 > 전원 안켜짐
문의 내용
소프트웨어 이상으로 인한 멈춤 및 배터리가 방전되었거나, 휴대폰 프로그램 이상, 회로 쪽 문제로 발생할 수 있습니다.
이렇게 해보세요
1단계휴대폰 전원을 길게 눌러도 안 켜지나요?
-
예
단말에서 핫스팟을 설정해 주세요.
-
아니오
2단계로 넘어가세요
2단계충전기 연결 상태에서 확인해 보시겠습니까?
-
예
충전기 및 충전 케이블을 교체하여 사용해 보세요
-
아니오
배터리 충전 상태 및 정품 충전기 여부를 확인해 보세요
조치 방법
소프트 리셋 안내
앱 등의 소프트웨어가 일시적으로 오류가 발생하여 전원이 안켜지는 듯하게 보일 수 있습니다.
전원이 자동으로 재부팅될 때까지 볼륨 (하) 버튼과 전원(측면) 버튼을 동시에 7초 이상 길게 눌러주세요.
이렇게 소프트 리셋을 하면 정상적으로 전원 구동 및 부팅이 될 수 있습니다.휴대폰에 케이스를 장차하여 사용하고 계실 경우 케이스를 분리하신 후 사용해 보시기 바랍니다.
-
전원 버튼 누른 후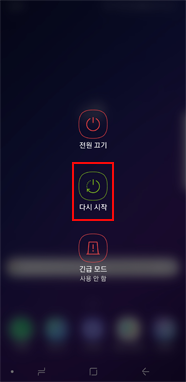
다시 시작 화면 -
[갤럭시 노트10]
전원 버튼+볼륨 아래키를 동시에
7초 이상 길게 눌러 재부팅 -
[갤럭시 S10/S9/S8/노트9/노트8]
전원 버튼+볼륨 아래키를 동시에
7초 이상 길게 눌러 재부팅
배터리 방전 가능성 및 정품 충전기로 충전 안내
배터리가 방전 되었을 수 있습니다.
구매시 박스에 구성품으로 제공된 정품 충전기와 케이블을 연결해주세요.
충전 표시가 0 %로 나타난다면 방전된 상태입니다.충전기 및 데이터 케이블 교체 테스트 안내
충전기 또는 케이블 이상으로 인해 제대로 충전이 안될 수 있습니다.
여분의 충전기와 케이블이 있다면 교체하여 충전한 다음 전원을 켜보세요.
그래도 전원이 켜지지 않는다면, 휴대폰, 구매 시 박스에 들어 있던 충전기, 케이블을 지참 후 가까운 서비스센터로 방문하여 엔지니어의 점검을 받아보시기 바랍니다.문제가 해결되지 않는다면 가까운 서비스센터로 방문하여 엔지니어의 정확한 점검을 받아 보시기를 권유 드립니다. "센터 방문 예약" 메뉴에서 예약 후 방문하시면 보다 빠른 서비스를 받으실 수 있습니다.
-
- Enterprise has solutions that are tailor-made for your industry.
https://qb.managemydemo.com/qb/launch/qbmanufacturing
https://quickbooks.intuit.com/desktop/enterprise/contact/product-tour/thank-you/
- QB POS v18 error Point of sale got stuck for a second and did't respond to your request
QB POS v18 error Point of sale got stuck for a second and did't respond to your request
I am installing a QB POS v 18 on a Microsoft Surface Pro X . Complies with all minimun requirement. Can not get the software started with my company file . Getting this error wen startign the program. If happens about 80% of the times. And can not do a sale. Any help? Runnign Windows Home edditrion 8 Gig Ram 64 bit
QuickBooks Team
May 30, 2020 09:11 AM
Hello there, @jecalderon.
I understand the importance of making a sale for you and your business. To isolate this unexpected behavior, let's perform some troubleshooting steps.
Before doing so, create a backup of your Point of Sale data, save any files you have open, and exit all programs.
To start, let's uninstall QuickBooks Point of Sale from your computer.
- On your keyboard, press Windows + R to open the Run window.
- Enter “Control Panel”, then select OK.
- Select Programs and Features. Note: If the Control Panel is in Category View, select Uninstall a Program.
- In the list of programs, select QuickBooks Desktop Point of Sale 18.0, then select Uninstall/Change.
- Follow the prompts to complete the process.
- Restart your computer.
Then install QuickBooks Point of Sale, ensure that your computer meets the system requirements. This way, you’re less likely to encounter any incompatibility issues.
- Click Next on the wizard to start the installation.
- Read and agree to the License Agreement, select I accept the terms in the license agreement then, Next.
- Enter your license and product number, then select Next.
- Choose the type of installation, then select Next.
Once done, run the Verify Data utility, it helps find damaged transactions, lists, or SQL table structure in your company file.
- Make the Debug mode accessible.
- From the Point of Sale Help menu, select About QuickBooks Point of Sale.
- With the Point of Sale information window open, simultaneously press Ctrl+Alt+D+B on your keyboard.
- Select OK to close the information window.
- Run the Verify utility.
- From the Help menu, select Debug, then Verify Data.
- After it completes, check the validation window to verify any issues.
You can also contact our Support Team, they can pull up your account securely and further investigate this. For the support's contact information, you can check it here: QuickBooks Desktop Point of Sale.
I've also added this article for more troubleshooting steps: Error: POS got stuck when using QuickBooks Point of Sale.
Leave a comment below if you have any other questions. I'm here to lend a hand. Have a good one and take care.
QuickBooks Error Message – Sorry POS got stuck for a second
Resolving the QuickBooks Error for Point of Sale

Below are some steps to assist you in resolving this QuickBooks error message.
- located in your C drive go to program data.
- Choose InstantAccept
- Right Click
- Click Properties
- Click Security>EDIT>ADD
- Type “EVERYONE” in the open box
- Give them full control
- Click Apply>OK
- Change or reset your Windows password
Change or reset your Windows password
Applies to: Windows 10Windows 8.1Windows 7
Select Product Version
All ProductsWindows 10Windows 8.1Windows 7
If you forgot or lost your password for Windows 10, Windows 8.1, or Windows 7, you may be able to change or reset it. To get started, choose your version of Windows from the Select Product Version drop-down menu.
Windows 10
If you already know your current password and want to change it
Select Start > Settings > Accounts > Sign-in options . Under Password, select the Change button and follow the steps.
Reset your Windows 10 local account password
If you’ve forgotten or lost your Windows 10 password for a local account and need to sign back in to your device, the below options might help you get up and running. For more info on local standard vs. administrative accounts, see Create a local user or administrator account in Windows 10.
Windows 10 version 1803 and later
If you added security questions when you set up your local account for Windows 10, then you have at least version 1803 and you can answer security questions to sign back in.
After you've entered an incorrect password:
- Select the Reset password link on the sign-in screen. If you use a PIN instead, see PIN sign-in issues. If you're using a work device that's on a network, you may not see an option to reset your password or PIN. In that case, contact your administrator.
Note
If you don't see security questions after you select the Reset password link, make sure your device name isn't the same as your local user account name (the name you see when you sign in). To see your device name, right-click Start in the taskbar, select System, and scroll to the Device specifications section. If the device name is the same as your account name, you can create a new administrator account, sign in as an administrator, and then rename your PC (when you view your device name, you can also rename it).
- Answer your security questions.
- Enter a new password.
- Sign in as usual with the new password.
Windows 10 before version 1803
For versions of Windows 10 earlier than 1803, local account passwords can't be reset because there are no security questions. You can reset your device to choose a new password, however this option will permanently delete your data, programs, and settings. If you've backed up your files you'll be able to restore your deleted files. For more information, see Recovery options in Windows 10.
To reset your device, which will delete data, programs, and settings:- Press the Shift key while you select the Power button > Restart in the lower-right corner of the screen.
- On the Choose an option screen, select Troubleshoot > Reset this PC.
- Select Remove everything.
Warning
Resetting your device will permanently delete data, programs, and settings.
Reset your Microsoft account password you use to sign in to your computer
On the sign-in screen, type your Microsoft account name if it's not already displayed. If there are multiple accounts on the computer, choose the one you want to reset. Below the password text box, select I forgot my password. Follow the steps to reset your password.
Troubleshoot problems signing in
If you're still having trouble signing to your account, see more solutions in Troubleshoot problems signing in.
Related articles
How to reset your Microsoft account password
To change your Microsoft account password
Reset your Windows 10 local account password
Last Updated: May 13, 2020
- Select the Reset password link on the sign-in screen. If you use a PIN instead, see PIN sign-in issues. If you're using a work device that's on a network, you may not see an option to reset your password or PIN. In that case, contact your administrator.
- Repair or remove programs in Windows 10
https://support.microsoft.com/en-us/help/4028054/windows-10-repair-or-remove-programs
Repair apps and programs
You can repair some apps and programs if they're not running correctly. Note that you won't see repair, change, or modify options for all apps and programs.
- Repair options from the Settings page
- Select the Start button, then select Settings > Apps > Apps & features. Or just click the shortcut link at the bottom of this article.
- Select the app you want to fix.
- Select the Advanced options link under the name of the app (some apps don't have this option). On the page that opens, select Repair if it's available. If it isn't available or doesn't fix the problem, select Reset.
- Repair options from the Control Panel
- In the search box on the taskbar, type Control Panel and select it from the results.
- Select Programs > Programs and Features.
- Right-click the program you want to fix and select Repair, or if that’s not available, select Change. Then follow the directions on the screen.
- For more tips, see Repair an Office application.
Uninstall or remove apps and programs
There are different ways to remove apps and programs, so if you can't find the one you're looking for, you can try another location. Note that some apps and programs are built into Windows and can't be uninstalled.
- Uninstall from the Start menu
- Select the Start button and look for the app or program in the list shown.
- Press and hold (or right-click) on the app, then select Uninstall.
- Uninstall from the Settings page
- Select the Start button, then select Settings > Apps > Apps & features. Or just click the shortcut link at the bottom of this article.
- Select the app you want to remove, and then select Uninstall.
- Uninstall from the Control Panel (for programs)
- In the search box on the taskbar, type Control Panel and select it from the results.
- Select Programs > Programs and Features.
- Press and hold (or right-click) on the program you want to remove and select Uninstall or Uninstall/Change. Then follow the directions on the screen.
- Need more help?
- If you can't find an app or program, try the tips in See all your apps in Windows 10 and Program is not listed in add/remove programs after installation.
- If you get an error message when you're uninstalling, try the Program Install and Uninstall Troubleshooter.
- If you're trying to remove malware, see Stay protected with Windows Security to find out how to run a scan. Or if you use another antivirus software program, check their virus protection options.
- Repair options from the Settings page
- Translations of Frequently Asked Questions Regarding PPP Loan Forgiveness
Translations of Frequently Asked Questions on PPP Loan Forgiveness
PPP Forgiveness Application (Short Form) translations
https://www.sba.gov/document/support-ppp-forgiveness-application-translations-short-form
Paycheck Protection Program EZ Loan Forgiveness Application
PPP Loan Forgiveness Application Instructions Translations
PPP Loan Forgiveness Application Instructions Translations
https://www.sba.gov/document/support-ppp-loan-forgiveness-application-instructions-translations
- Windows 10
https://docs.microsoft.com/en-us/windows/windows-10/
Find the latest how to and support content that IT pros need to evaluate, plan, deploy, secure and manage devices running Windows 10.
- Howcomputer Location
HowComputer Location
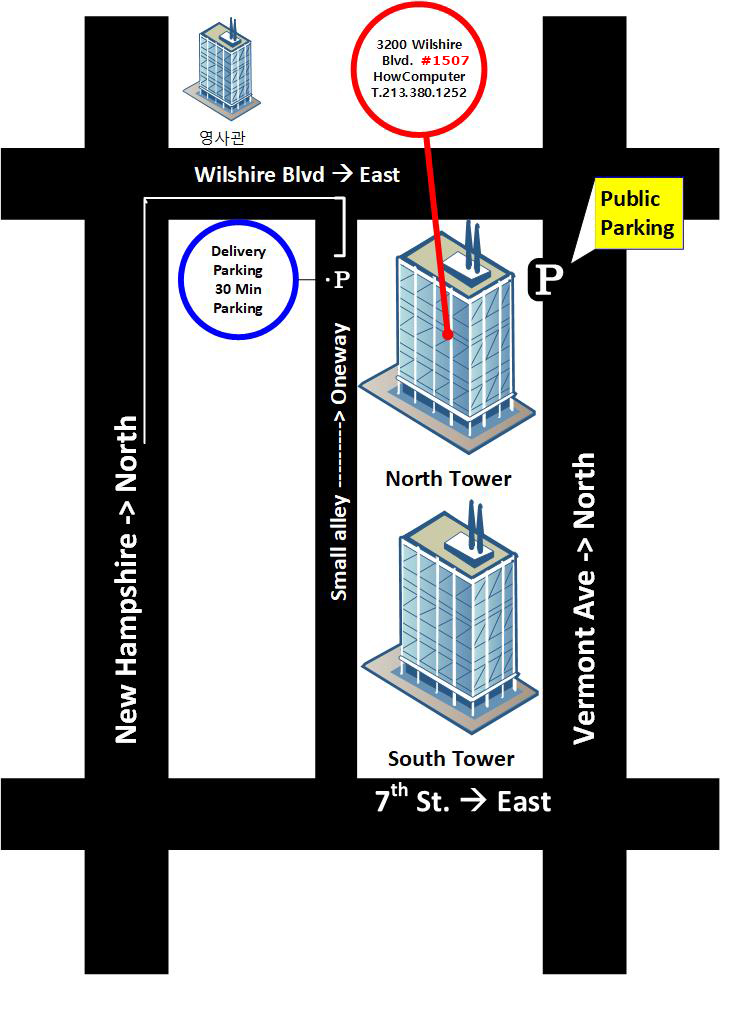
3200 Wilshire Blvd. Suite 1507, Los Angeles, CA 90010
- Read Gmail messages on other email clients using POP
Read Gmail messages on other email clients using POP
You can open your messages from Gmail in other mail clients that support POP, like Microsoft Outlook.
Step 1: Make sure POP is the best way to read your emails
IMAP and POP are both ways to read your Gmail messages in other email clients.
IMAP can be used across multiple devices. Emails are synced in real time.
POP can only be used for a single computer. Emails aren't synced in real time. Instead, they're downloaded and you decide how often you want to download new emails.
Step 2: Set up POP
First, set up POP in Gmail
- On your computer, open Gmail.
- In the top right, click Settings
See all settings.
- Click the Forwarding and POP/IMAP tab.
- In the "POP download" section, select Enable POP for all mail or Enable POP for mail that arrives from now on.
- At the bottom of the page, click Save Changes.
Next, make changes on your email client
Go to your client, like Microsoft Outlook, and check these settings.
Incoming Mail (POP) Server pop.gmail.com
Requires SSL: Yes
Port: 995
Outgoing Mail (SMTP) Server smtp.gmail.com
Requires SSL: Yes
Requires TLS: Yes (if available)
Requires Authentication: Yes
Port for TLS/STARTTLS: 587
If you use Gmail with your work or school account, check with your administrator for the correct SMTP configuration.
Server timeouts Greater than 1 minute (5 is recommended) Full Name or Display Name Your name Account Name, User Name, or Email address Your email address Password Your Gmail password - 시민권 신청서 재발급
USCIS 웹사이트(www.uscis.gov/n-565)나 우편(USCIS P.O. Box 20050, Phoenix, AZ 85036)으로 N-565 Form 신청서를 제출.
신청비용은 555불과 여권용 사진 2장을 같이 보내야함
